Joining meetings and inviting others
Joining and inviting others to Teams meetings
Table of contents
2. Invite people to a meeting [edit]
3. Schedule MS Teams meetings and provide access on QMplus [edit]
3.1. Adding access links to QMplus
4. Start an ad-hoc meeting [edit]
5. Start a meeting using Chat [edit]
7. Start a team meeting [edit]
8. Scheduling a meeting [edit]
9. Schedule a meeting with Outlook (calendar event meetings) [edit]
11. Accessibility [edit]
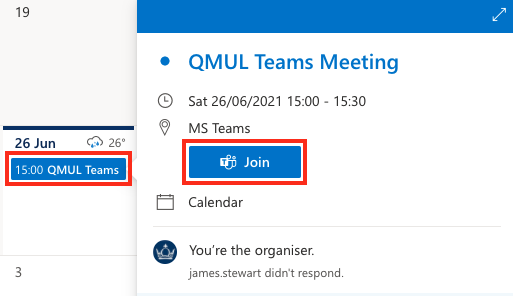
Join a meeting [edit]
Join a meeting in Microsoft Teams - Microsoft Support Guide.
Invite people to a meeting [edit]
Invite people to meeting in Microsoft Teams - Microsoft Support Guide
Schedule MS Teams meetings and provide access on QMplus [edit]
Online meetings can be created instantly. However, when planning upcoming teaching sessions, events, or online presentations, you may want to schedule Teams sessions in advance. You can schedule single meetings or recurring sessions (i.e., your teaching schedule for the term), which generates joining information to share with participants. Meeting access links can be posted on QMplus, added to an Outlook calendar invitation, or shared via email.
Adding access links to QMplus
If you would like to post a meeting link on QMplus for students, log in to your account and navigate to the module you would like to update and Turn editing on at the top-right corner of your module.

Click the Plus (+) icon to Add an activity or resource under the relevant topic.

With the activity chooser, search ‘URL’, and select the URL resource.

Give the link a Name and paste your Teams access link in the External URL field. In the Description you can add the date and time of the meeting and the passcode (if applicable).

Click Save and return to course to add the URL.
Students can click this link in QMplus to automatically launch the meeting.
Start an ad-hoc meeting [edit]
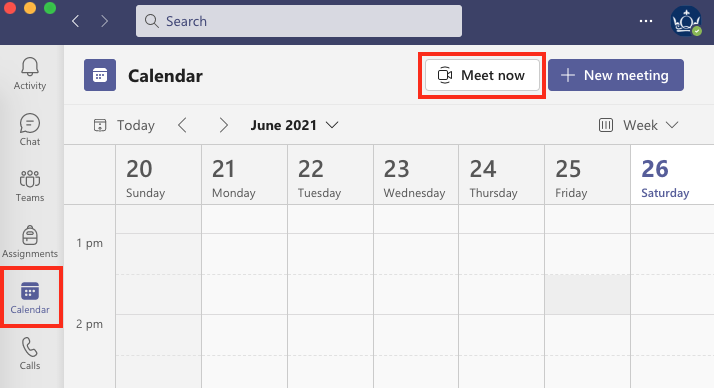
There are several ways to initiate an ad-hoc meeting with other MS Teams users. If you need to quickly create a meeting to take place as soon as possible, select the Calendar tab click Meet now.
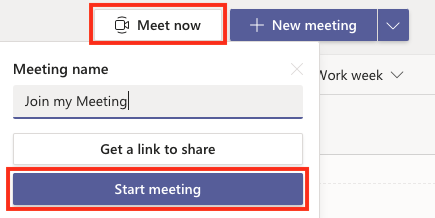
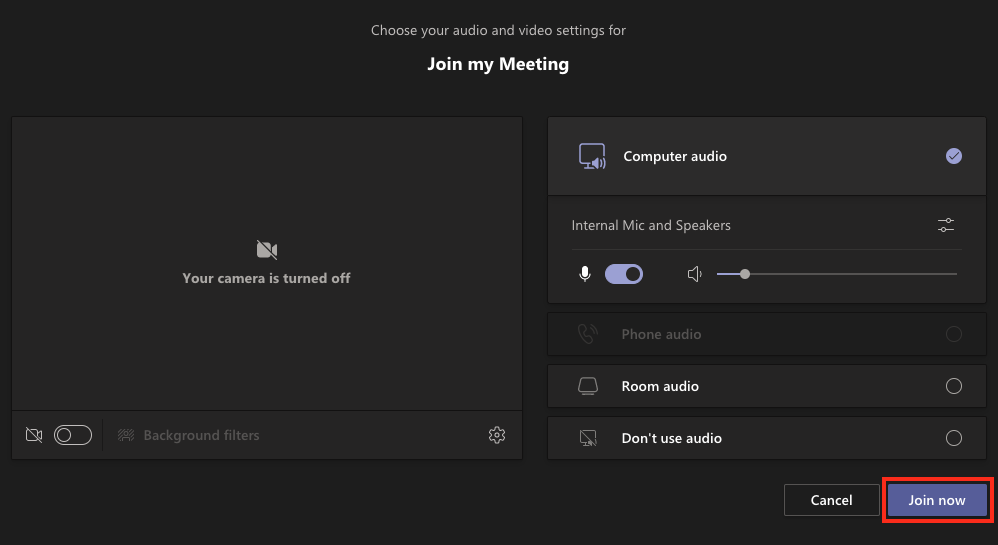
From the menu, select Start meeting to instantly create a session. This can be useful if you would like to test meeting features in Teams without calling other users, or if you would like to configure your meeting before inviting others to join.
You will be presented with audio and video configuration settings. Once ready, click Join now to enter the meeting room.
You will be presented with two ways to invite people to join your meeting:
- Copy meeting link will add a link to your clipboard which can be emailed or texted to others (using the Paste shortcut on your keyboard). Anyone who clicks the link will automatically enter your meeting.
- Add participants will allow you to search for other Teams users in your organisation. If they have Teams open, the participant will instantly receive a notification to join your session.

Start a meeting using Chat [edit]
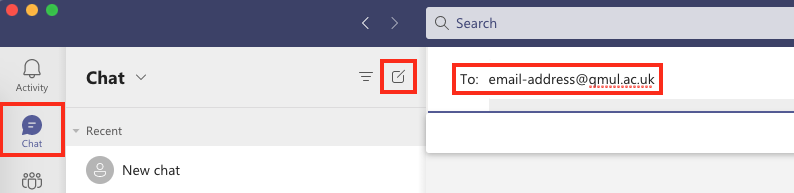
You can use the Chat panel to call users directly. SelectChaton the left side of the MS Teams window and click the‘New chat’ icon, enter their name or email address in the 'To:’ field and select their profile from the list.
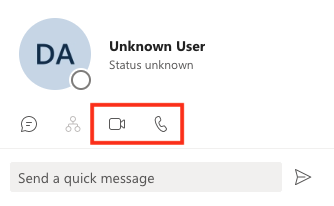
With the new Chat area created with the selected user, click the video camera icon button at the top-right corner of the window. The drop down menu will allow you to choose between a video and an audio call. Select your preference to begin the meeting.

Call users directly [edit]
You can call users by selecting their profile image anywhere it appears in Teams to reveal their contact card. Select the video or audio call buttons under their name to initiate a meeting.
Start a team meeting [edit]
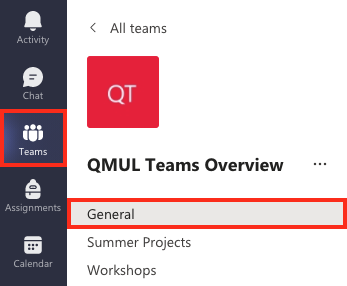
To initiate an ad-hoc meeting with an entire team, click the Teams tab on the left side of the window and open the channel you want to host the meeting.
At the top-right corner of any team channel, you will see an option to Meet now or Schedule a meeting. When the meeting beings, all members of that channel will be notified that a meeting is taking place.

Scheduling a meeting [edit]
You may not want to create a team workspace or start a chat to facilitate online meetings. If you will only utilise the video conferencing features of Teams, simply schedule a meeting and share the joining details with attendees.
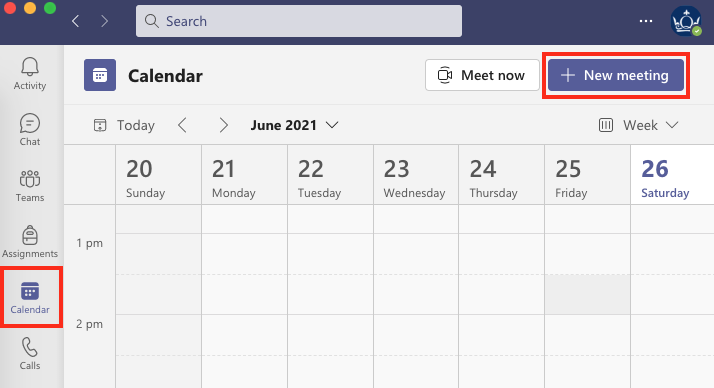
To begin scheduling a meeting, select the Calendar tab on the left side of the window and click ‘+ New meeting’ at the top-right corner of the window.
The scheduling interface is similar to creating meetings in Outlook. Give your meeting a title, add attendees, set the date and whether it is a recurring meeting, and add any relevant details into the description field. Once ready, click Save and the event will be distributed to attendees via email and automatically added to your Teams calendar.

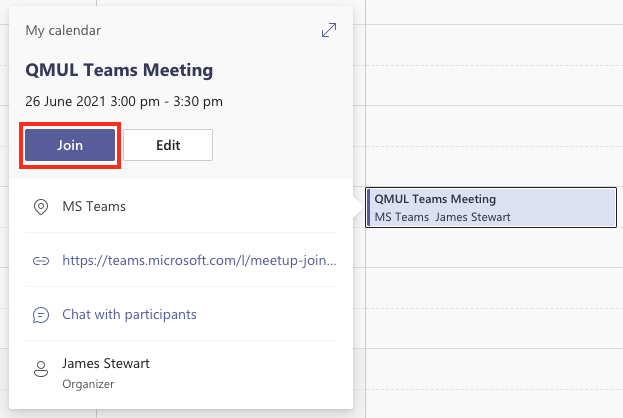
To join the meeting either click the meeting link in the event description from your Outlook calendar, or open the Teams calendar, select the event, and click Join.
Schedule a meeting with Outlook (calendar event meetings) [edit]
If you prefer to schedule meetings in Outlook, you can also quickly set scheduled events to take place within MS Teams. Create an event in your calendar as normal and invite at least one other attendee to the event.
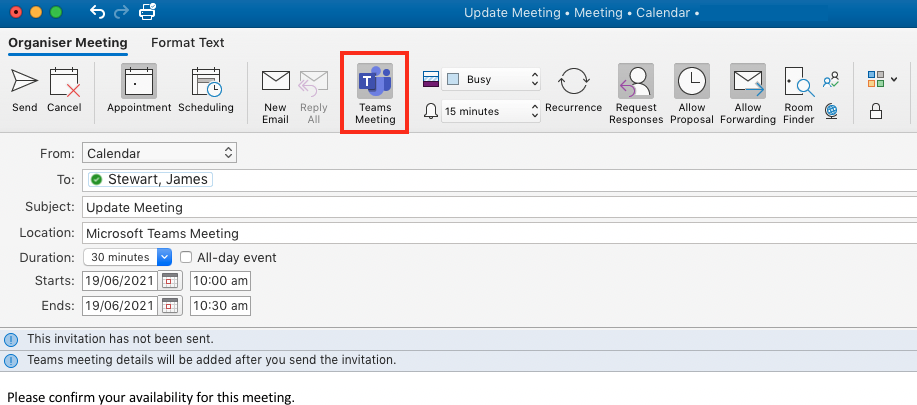
On the Desktop Client you will see a Teams meeting button appear in your event settings bar. Click this button which will automatically create a meeting link for the session and fill the text ‘Microsoft Teams Meeting’ in the Location field. You will not immediately see the link to your meeting, but this will be added once the invitation is sent.
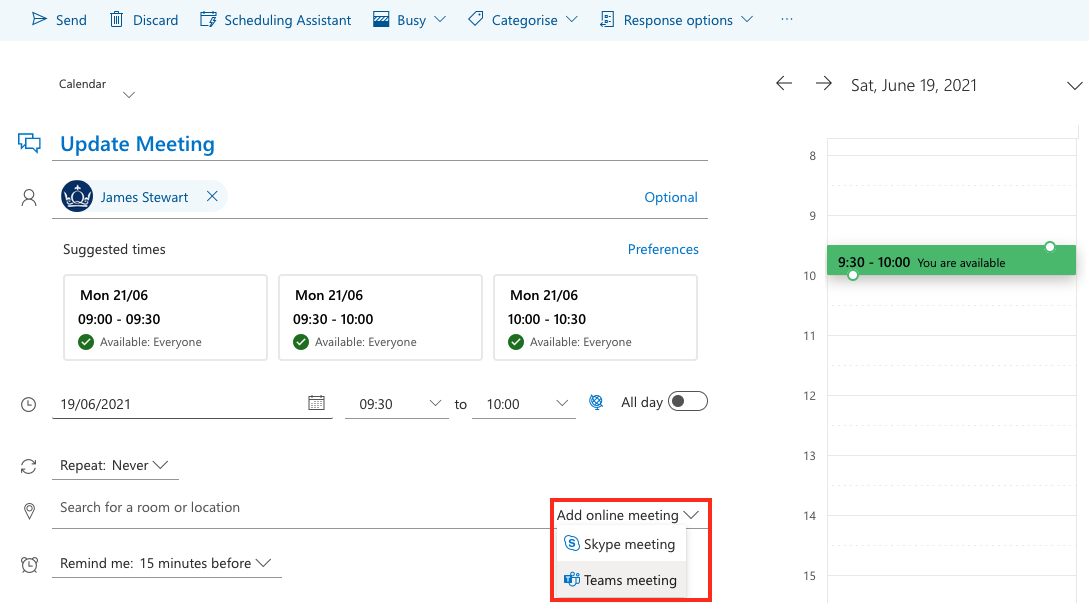
Using Outlook on the web, after adding at least one attendee to a calendar event, you will see an option called Add online meeting. Select Teams meeting from the list and an online meeting will be automatically created.
To join the meeting, simply click the link in the description of your Outlook event which will open the Teams meeting.
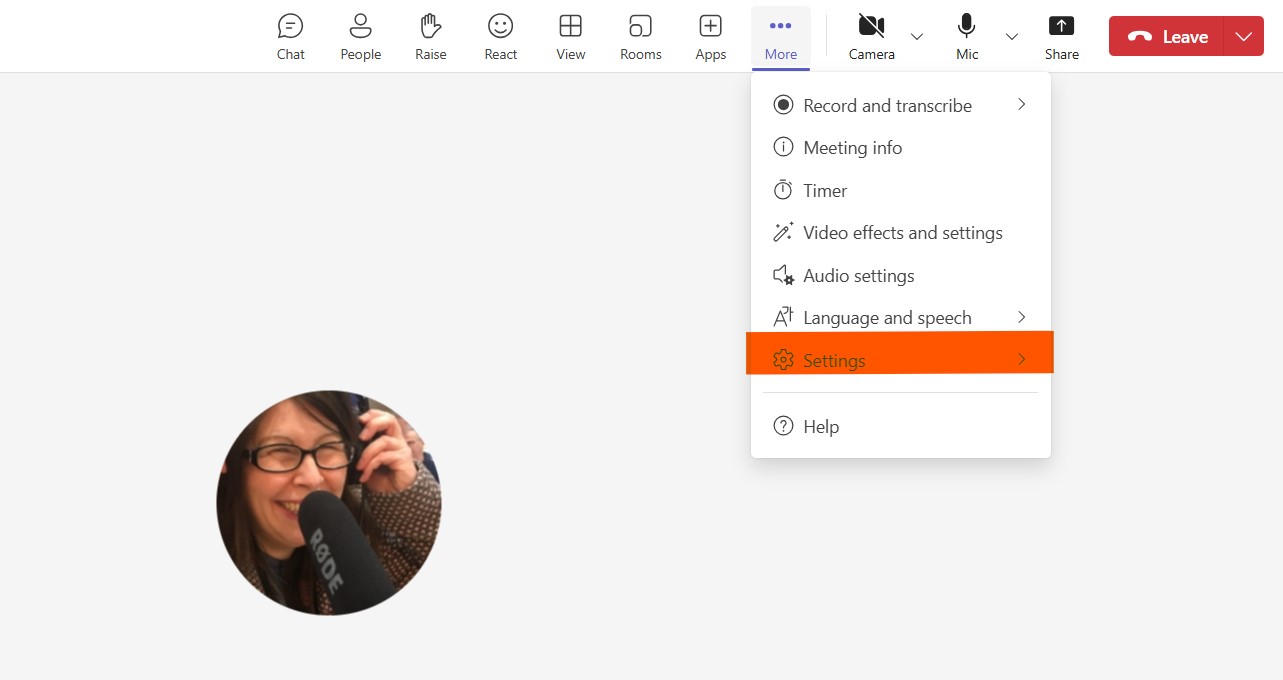
Meeting options [edit]
To decide access for participants to all of the available features in Teams, you can adjust the Meeting options.
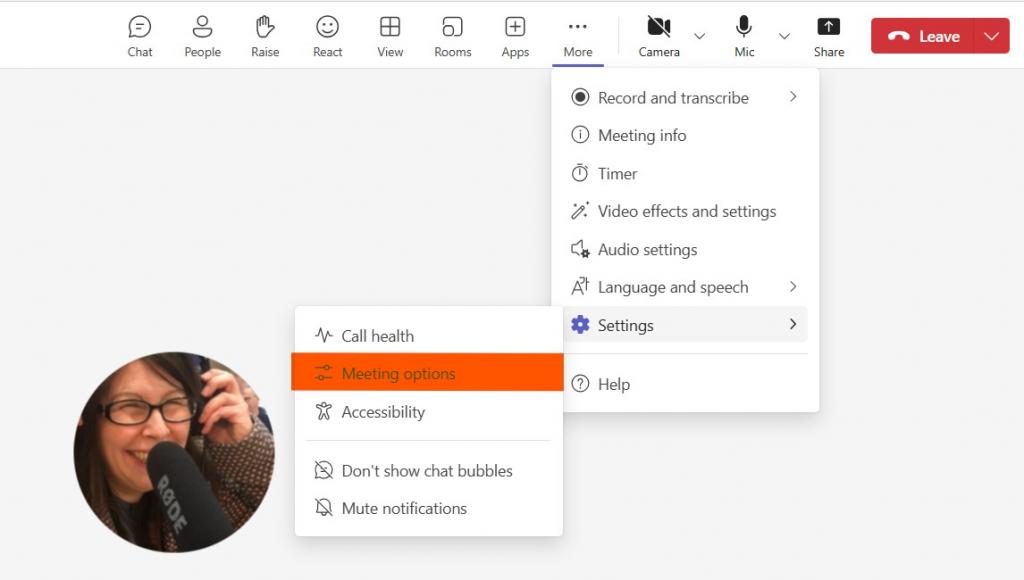
These can be accessed during a meeting by selecting the More (…) icon at the top of the window. From the drop down window select Settings.
Click on Settings. A new side window opens. From this, select Meeting options.
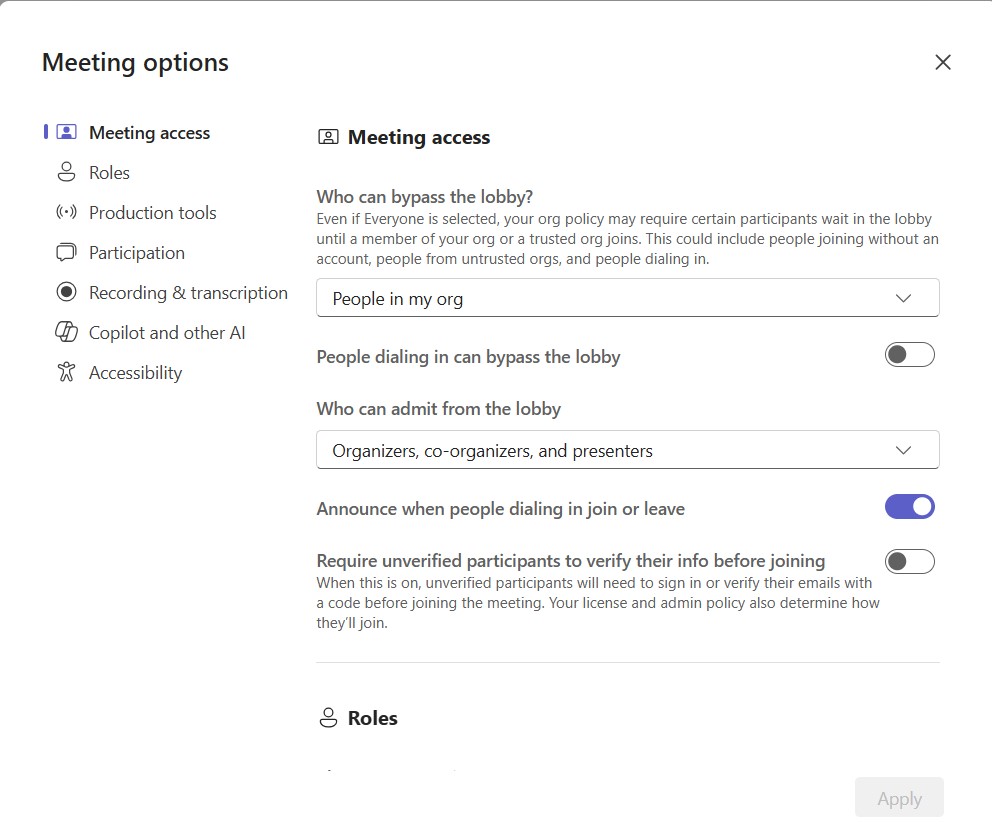
A separate new window opens. From this Meeting options window, you can decide on various parameters for your meeting.
Scroll through the options on the right or select them from the left menu to determine which settings are most suitable for your meeting.
You’ll see that some options are already activated – these have a blue background.
Click on the button to activate or deactivate options.
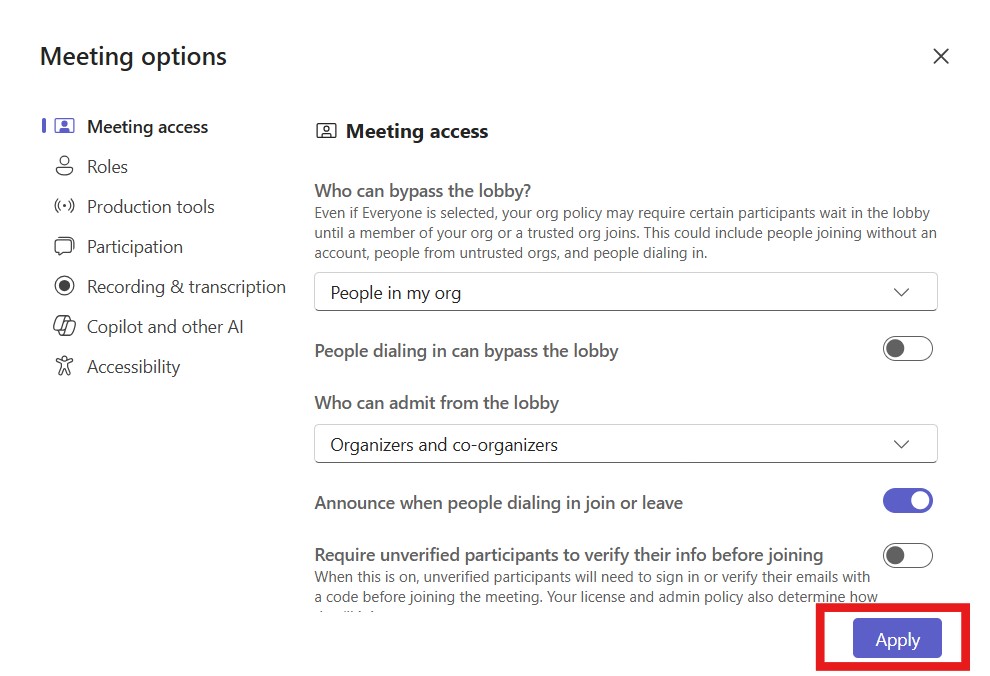
In the Meeting access option, you can select who can bypass the lobby and who can admit participants from the lobby. You can also request that unverified participants sign in or verify their email address with a code before joining the meeting.
Roles enables you to nominate invitees to be co-organisers. This is particularly useful if you won’t be attending the meeting yourself. The co-organiser can run the meeting. In this section you can also select who is able to present. This option can be changed during the meeting in the active MS Teams app.
Production tools enables organisers and presenters to check their audio, video and content before attendees are admitted. You’ll need to active this setting before the meeting starts.
Participation determines the mic and camera permissions you give participants.
In this section you can also decide whether or not to activate the chat facility.
Take a look at the Q&A and reactions functionality. You may find these useful for teaching purposes.
And finally you can also decide whether or not you want an attendance report to be generated at the end of the lecture.
Recording and transcription gives you the option to record and transcribe your session automatically, so you won’t need to remember to hit the record button at the start of the lecture.
Our use of Copilot and other AI is determined by our IT team, so is not a variable function. It is set to be used during and after the meeting.
The final option is called Accessibility and here you can select CART captioning. This requires a link to be sent to a translater ahead of the scheduled meeting time.
[Please note, if you don't want to use CART captioning, automated captions can be selected during the MS Teams meeting. A description of where to find the automated captions and other accessibility options can be found in the next section of this guide.
Once you have selected your options, make sure to save them by pressing Apply at the bottom right of the Meeting options window.
Meeting options can also be configured in advance for meetings scheduled in Teams or Outlook.
Open the calendar event.
Select Meeting options
This will open the same Meetings options window described above.
You may wish to follow our video guides on Meeting options.
How to amend MS Teams Meeting options during a lecture
How to access MS Teams Meeting options in your calendar invite
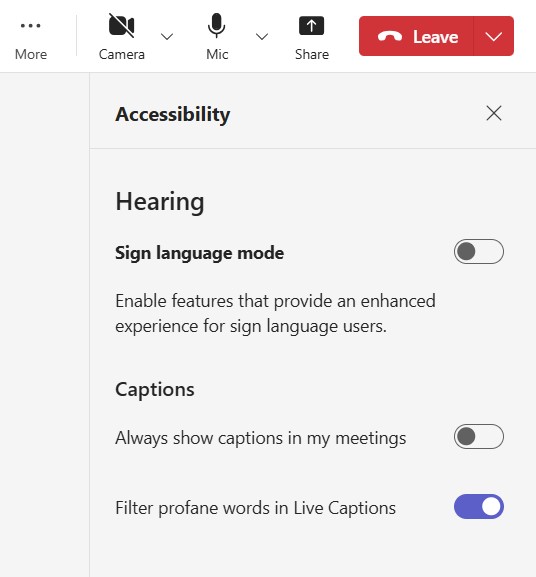
Accessibility [edit]
To use accessibility options, including automated captions during a meeting:
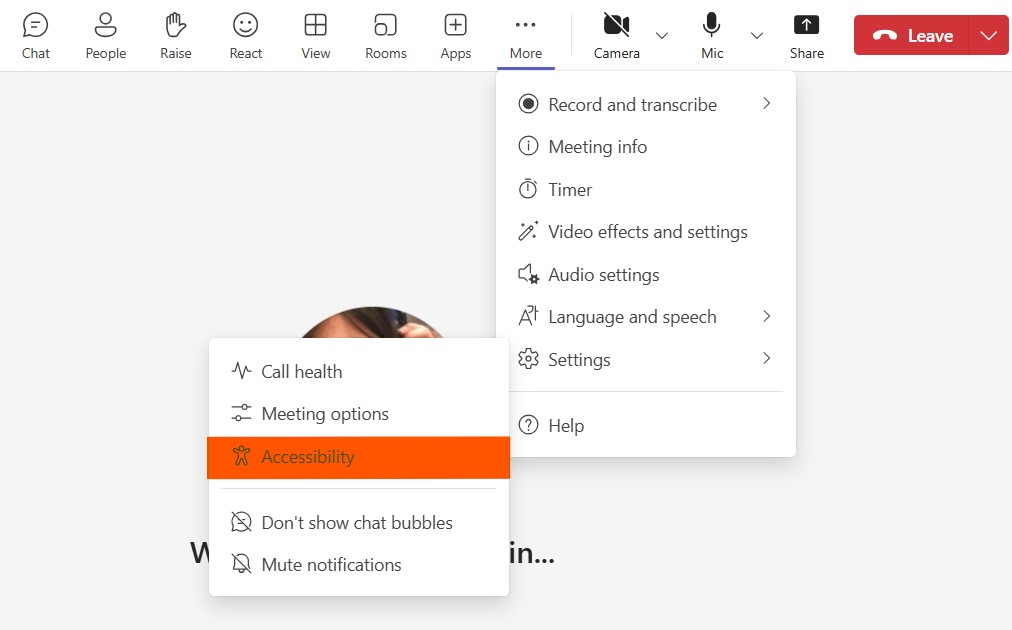
Select the More [...] icon and click on settings
![Image showing the More [...] icon and menu, with the Settings option highlighted.](https://qmplus.qmul.ac.uk/pluginfile.php/4163924/mod_wiki/attachments/2688/imageopt/1024/1 More menu and Settings (1).jpg)
A new side window opens. Select Accessibility
A control pane will open the Accessibility options in your meeting window.