Activities
(THE ACTIVITIES BELOW WILL BE REVIEWED AND UPDATED)
Assignments, Attendance, Cadmus (plugin), Certificates, Chats, Checklists, Databases, External Tools (e.g. Q-Review, Talis, Wiley, Zoom etc), Forums, Glossaries, Lessons, LinkedIn Learning, SCORM packages, H5P, Blogs and Wikis, Quizzes, Surveys, Workshops
Using the Checklist to keep students on track
Table of contents
1. Creating a new Checklist [edit]
2. Editing the checklist [edit]
3. Viewing the students' progress [edit]
4. Adding the Checklist block [edit]
Creating a new Checklist [edit]
Click the Edit mode button to on (top right of your screen).
. Select the topic where you would like to add your checklist and click on Add a activity or resource. From the Activity, click on ‘Checklist' and then click on Add.
In the Checklist field, enter a suitable name for your checklist and in the Introduction field, add a small description of the checklist.
The Settings sections includes the overall settings for the checklist.
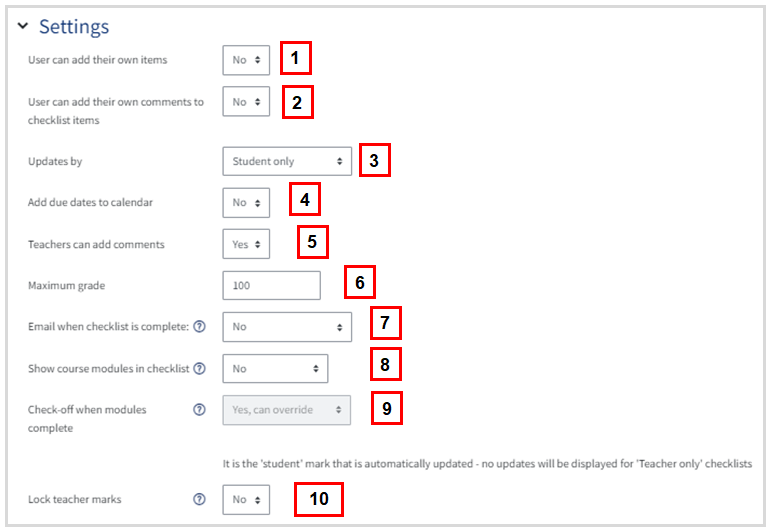
- Users can add their own items - If set to yes, additional items can be added to the checklist by either the student, teacher or both.
- Users can add their own comments - As the student completes items from the checklist, they can add notes.
- Updates by - When an activity is completed, it can be ticked off as complete by the teacher, student or both.
- Add due dates to calendar - The due dates of all activities within the course is automatically added to the calendar. The calendar block will need to be added to see these due dates.
- Teachers can add comments - As the student completes items from the checklist, the teacher can add notes (feedback, prompts, etc.)
- Maximum grade - This activity can be graded, should the teacher wish.
- Email when checklist is complete - When the checklist is complete, a email notification can be sent to the student, the teacher or both.
- Show course modules in checklist - If yes selected, all activities within the whole section (all activities within the course) will be added. If no selected, only activities within the current section (the topic you have added the checklist to) will be added.
- Check-off when module complete - This automatically checks-off items in the checklist when the activity is completed in the course.
- Lock teachers marks - When this setting is enabled, once a teacher has saved a 'Yes' mark, they will be unable to change it. Users within the capability 'mod/checklist:updatelocked' will still be able to change the mark.
Once you have made changes to the settings, scroll down to the bottom of the page and click on either Save and Display (display the checklist) or Save and Return to course (display the checklist within the course).
Editing the checklist [edit]
From your course, click on the Checklist.
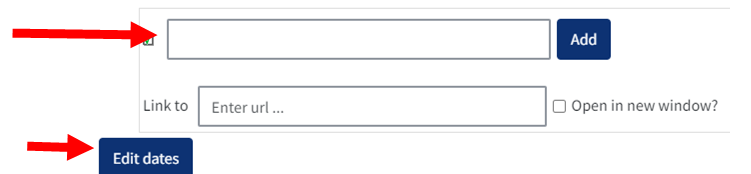
Enter the checklist items which are required, with any dates required using the 'edit dates' button, you can also add a URL linking to any documents or sites needed.
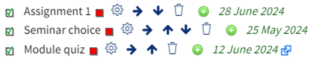
You can now see a list of all the activities that need to be completed by the student.
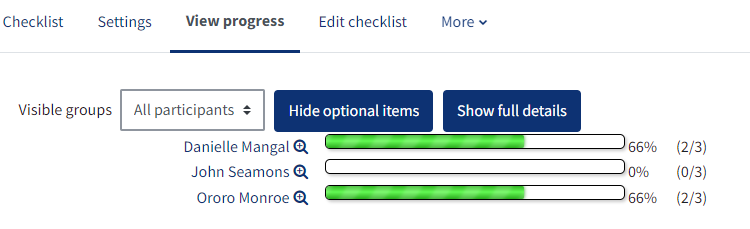
Viewing the students' progress [edit]
Click on 'View Progress'.

The report lists all the students from this course and whether they have completed the activities. If the student has completed an activity it is indicated using a tick.
The teacher can display the report as a progress bar by clicking on the Show Progress bars tab.
Adding the Checklist block [edit]
For an overview of Blocks and how they work, please visit the Blocks guide
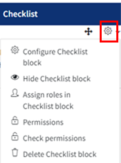
Before you can add the block, you will need to click on Turn Editing On button. From Add a Block, click on Checklist.
This will display the Checklist block. Click on the cogwheel to configure the checklist.
You can then configure the settings
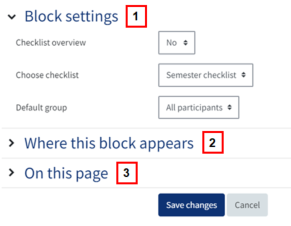
- Block Settings
- Checklist overview: This will display a link to all the checklists available on the course and should be set to No
- Choose Checklist: Choose the checklist you would like to be displayed on the course page
- Default group: If you have used groups, then select the group that will be using the checklist
- Where this block appears: configure where the checklist should appear
- On this page: configure where the checklist should appear
- Click on Save Changes to update the block
You will now be able to see the progress bars for your students in the block.
Students view of the Checklist [edit]
1. Students will need to click on the checklist from the course page.
2. They will then be able to tick off the items once they have completed it on the course.
3. If the Checklist block has been added to the course page, a student can see their overall progress on the course.t-size: 1.5rem;">