Level Up (gamification)
Level Up (gamification)
Table of contents
1. Introduction to Level Up [edit]
2. Adding Level Up to a QMplus module [edit]
3. Setting up [edit]
3.1. Number of levels
3.2. Earning points
3.3. Leaderboard display
Introduction to Level Up [edit]
Level Up XP is a gamification plugin for QMplus that enables educators to add an engaging, game-like layer to their modules. By awarding experience points (XP) for student activity - such as completing quizzes, participating in forums, or accessing course materials - the plugin encourages learners to stay motivated and involved throughout the course.
Designed with flexibility in mind, Level Up XP allows academics to create custom progression systems, set up levels, and display progress through a visual leaderboard or progress bar. This helps foster a sense of achievement and friendly competition among students, without interfering with formal assessment.
This guide is intended to help you understand the core features of Level Up XP and provide step-by-step instructions for integrating gamification into your QMplus modules effectively. Whether you're looking to boost student engagement or simply experiment with new teaching strategies, Level Up XP offers a straightforward way to make your learning environment more interactive and rewarding.
Adding Level Up to a QMplus module [edit]
Adding Level Up XP to your module is simple:
- Navigate to your QMplus module page.
- Turn on edit mode.
- Open the block drawer.
- Select Add a block and choose Level Up XP from the list.
- The block will appear in the block drawer. You can choose to keep in the block drawer, or drag the block to the top or bottom of your module page.
- Click info to access the dashboard.

Setting up [edit]
Before you begin using Level Up XP, consider the following setup decisions:
- Number of levels: How many levels do you want in your course, and how many experience points (XP) should be required to reach each one?
- Earning points: What student actions, such as completing activities or participating in forums, will earn XP?
- Leaderboard display: What type of leaderboard would you like to show, if any, and how should it appear to students?
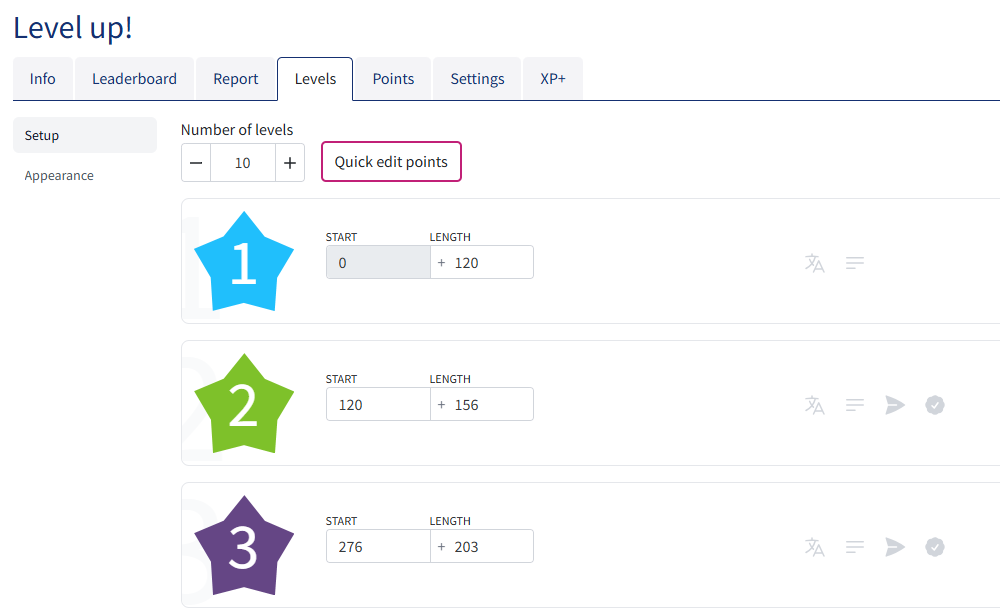
Number of levels
To set up your levels, go to the Levels menu in the Level Up XP dashboard.
By default, there are 10 levels, but you can easily add or remove levels to suit your module needs. You can also customise how many experience points (XP) are required to reach each level.
If you'd like to change the visual appearance of the level badges, you can do so via the Appearance menu.
For more detailed instructions, refer to the Customising the Levels section of the Level Up Documentation.
Earning points
To set up your points, go to the Points menu in the Level Up XP dashboard.
Points enable learners to advance through levels. You can decide the frequency, quantity, and the criteria for awarding points.
There are several ways to give points to learners:
- Event rules - based on events broadcasted internally in Moodle as users perform certain actions.
- Completion - allow educators to award points based on the completion of activities, sections and courses. This requires you to be familiar with completion tracking on QMplus, since you will need to add completion conditions to your activities. See our guide on how to do this: Course and activity completion.
- Grade Rules - allow educators to award points based on the grades received by the learners.
- Drops - code snippets that an educator can hide in the content of a course to award points when said content is being presented to the learner.
- Import - Educators can import points from a CSV file. This is useful to award points in bulk, or to allocate points for actions taken outside of QMplus.
- Manually - You can manually award points by navigating to the report menu and selecting "Award points" next to the learner's name.
To learn more about each of these methods of awarding points, refer to the Points section of the Level Up Documentation.
Leaderboard display
To set up your leaderboard, go to the Leaderboard menu in the Level Up XP dashboard. Click the three dots in the right-hand corner to access the settings.
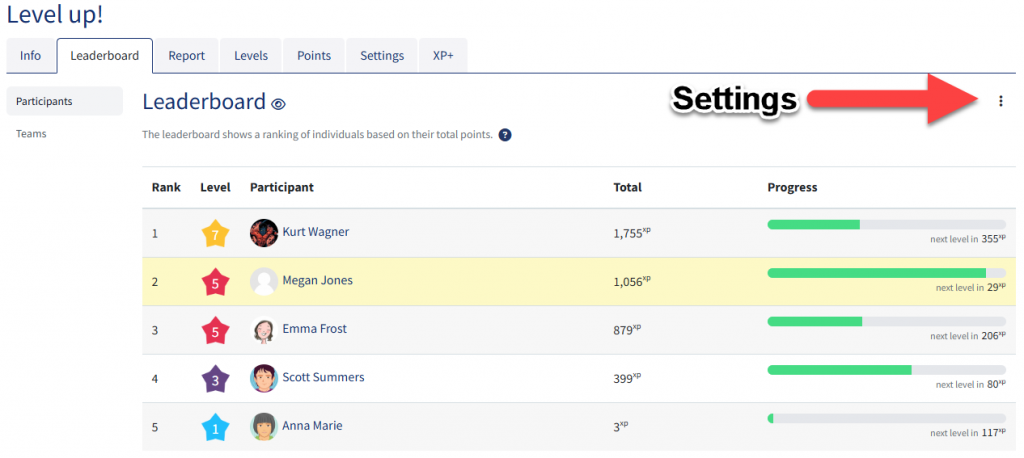
The leaderboard shows a ranking of individuals based on their total points. When used in a module with groups, it can create a ranking for each group.
Several options are available to customise the leaderboard and the experience it will give to the participants:
- Enable - When set to 'no', students will not be able to view the leaderboard.
- Anonymity - This controls whether students can see each other's names and avatar.
- Limit participants - This setting controls who is displayed on the leaderboard. For example, if choosing 'Display 2 neighbours', only the two participants ranked directly higher and lower than the current user will be displayed.
- Ranking - Choose if the user can see their current, or relative, position on the leaderboard.
- Team leaderboard - Shows a ranking of teams based on the total cumulated points of their members. The teams can be made out of course groups or cohorts.
To learn more, refer to the Leaderboard section of the Level Up Documentation.
Reports [edit]
Educators can access a report that provides an overview of their students’ current levels and progress. The report includes flexible options.
You can:
- Filter results by student name
- Manually award points
- Review detailed activity logs
.png)
Further Resources [edit]
The plugin developers team have provided useful guidance: Level Up Documentation
You can also watch the TEL Show and Share webinar on Level Up to explore the application's features and real-world use cases: