Make your videos easy to navigate with chapters (Staff and Students)
Completion requirements
Navigate with chapters
Table of contents
1. Why should I use chapters? [edit]
2. What do chapters look like? [edit]
3. How to add chapters to your videos [edit]
4. Other ways you can make your videos easy to navigate [edit]
Return to the Main QMplus Media Site
Why should I use chapters? [edit]
We recommend that when you create videos, you try to keep them as short as possible. However if you do end up with something longer you can use a feature of QMplus Media, called chapters, to make your video easier to navigate. Chapters are like bookmarks, you can place them at appropriate places in your video and viewers will be able to jump directly to those points by clicking on the chapter title in the player. If you use the Kaltura Capture application to record your PowerPoint presentation, the application will automatically create chapters for you.
What do chapters look like? [edit]
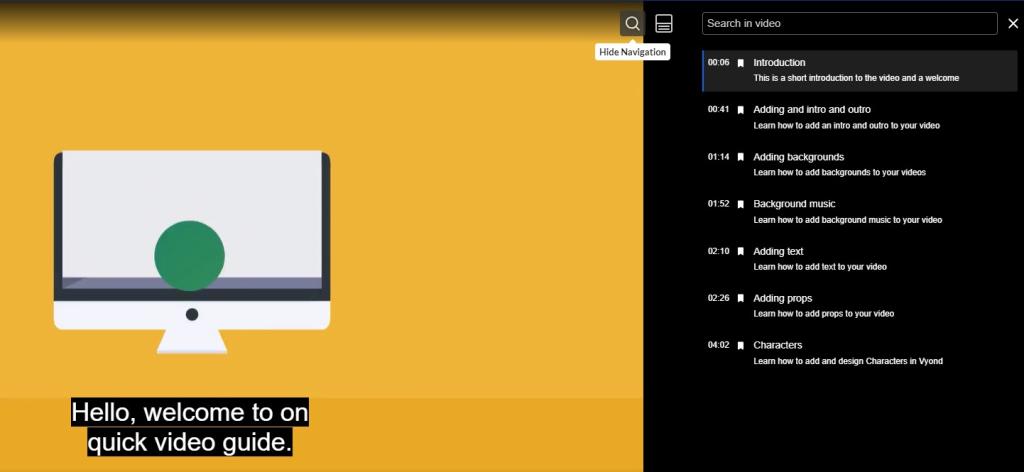
When viewed in a web browser, chapters can be seen by clicking on the spyglass at the top left of the screen.

The chapter menu shows the name and description for each chapter. Selecting a chapter in the menu will jump to that place in the video. You can also search the chapter descriptions for key words to help find what you’re looking for in the video.
How to add chapters to your videos [edit]
![]()
You can also do this by logging in to the QMplus Media web interface.
Select the Timeline option from the list below the video.

Now you need to define the points in your video where you want your chapters to be. The easiest way to do this is to use the controls in the video player to find the appropriate point in the video and then pause the video.


Now complete the required information for your new chapter:
- Chapter thumbnail – the thumbnail is the background image used in the chapter navigation drawer in the video player. You can choose the Auto function to use the frame of the video that is at this point, or you can use the Upload option to upload an image.
- Chapter information – fill in a chapter title and description. You should keep the text in these as short as possible. You can also fine tune the time of the chapter if necessary and add some keywords to aid with searching
- Once you are happy, select Save. If you’d like to see what your new chapter looks like in the player, select the View in player option and the player will update.
You continue moving through your video, adding chapters, until you are finished.

Selecting any of the chapter icons on the timeline will allow you to edit the details for the chapter, or delete it completely.
Other ways you can make your videos easy to navigate [edit]
- Chop long videos into shorter chunks using the online editor on QMplus Media
- Add captions to your video…you should be doing this anyway to make your video more accessible – using the auto-captioning feature in QMplus Media will generate an interactive transcript for your video. You can click on words in the transcript to jump to that place in the video. The transcript can also be searched.
- Break up your video with a quiz. You can use the QMplus Media video quiz tool to insert questions into your videos.
- Recording voice over Powerpoint? Use Kaltura Capture to automatically create chapters for your videos