Navigating QMplus
Accessing QMplus
QMplus is accessible over the Internet with your college computing IMAP username (e.g. ydw123) and password (the same as the ones you use for QMUL email). You are able to access your live course from any location with internet access at any time.
You can log into QMplus by going to this website, and clicking the Log in button.
If you have problems accessing or using QMplus, please raise a ticket with the IT Service Desk. QMplus is compatible with any up-to-date browser, including Chrome, Firefox & Safari. If you are using an old, outdated browser or using Internet Explorer/Edge you may have trouble with aspects of QMplus or activities within it.
You can check your browser is up-to-date at the What is my browser website
Home Pages (landing pages) in QMplus
My home pages are an important feature of QMplus. This is the school home page that appears when you log in and is where you are taken if you click on the QMplus logo. For the majority of staff and students, your home page will be a School or Departmental page however home pages can also be defined for a programme of study.
The advantages of home pages are:
- They provide a connection between the modules/courses that our students are taking and the programme/school or institute they are studying in.
- They enable communication of key information to all staff and students in your school.
My Modules in QMplus
Once you are logged into QMplus you will be able to access all the modules you have been enrolled onto.
Please note, teachers may ‘hide’ courses from students whilst they prepare academic content. In this case, the module will not display in your module list. If you believe you should have access to a module that is not on your list, please contact your school administrator, or take a look at this page.
What does a Course Area on QMplus look like?
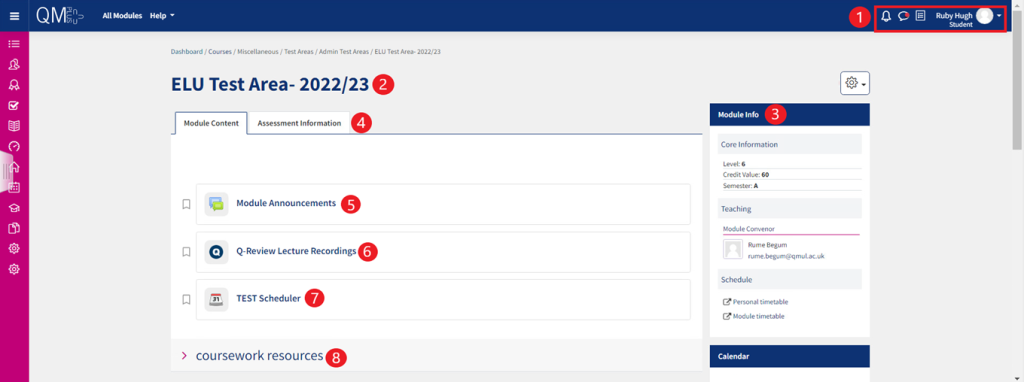
Below is an example of a typical QMplus course page, with some of the commonly found ‘blocks’, activities and resources.

- You will see these options at the top of every page.
- Notifications – used to check and read your notifications
- Messages – used to check and read your messages
- Activity to do list – used to check your to do list
- Profile – links to profile, timetable, Gradesplus, My Media, My Files, QMplus Hub, and log out button
- Course title – The course title is always displayed here.
- Module Info block – This block gives details of the course, the teacher and their contact details as well as a link to the timetable.
- Assessment Information area – Shown in full below.
- Module Announcements – Any announcements for your course will be shown here.
- Q-Review Lecture Recordings – This maybe present on your QMplus page, if it is, then it links to a portal in which you can view any lecture recordings for the course.
- Scheduler – This may be present, if it is, it links to a booking system for you to schedule meetings with your teachers.
- Course section – In this section, you may find activities and resources for the course.
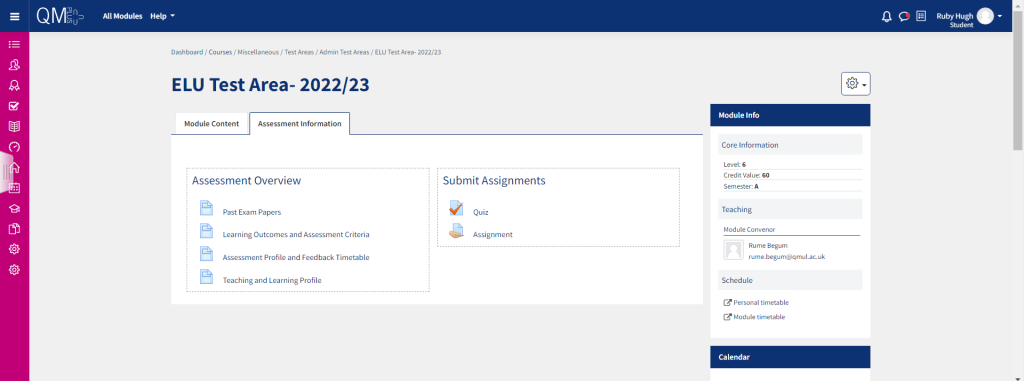
Assessment Information area – This is divided into two sections:

- Assessment overview – Here you will find links to assessment resources, such as past exam papers and documents detailing the assessment criteria.
- Submit Assignments – Here you will find links to the assignment and quizzes which you will need to complete/submit.
Personalising your Profile in QMplus
Step 1: Find your profile
Once you have logged into QMplus, click on your name in the top-right corner and then select Profile:

Step 2: Edit your profile
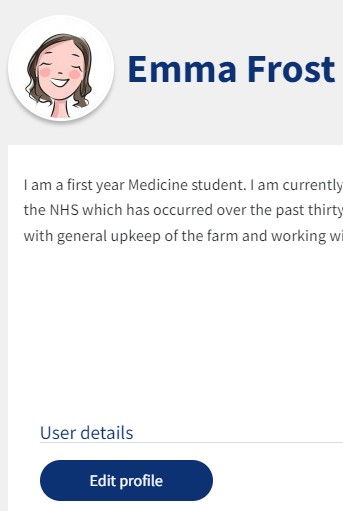
Under User Details click Edit Profile.

2. You may wish to change settings related to:
- your email visibility
- receiving emails
- forum subscriptions
- forum tracking
Step 3: Upload an image
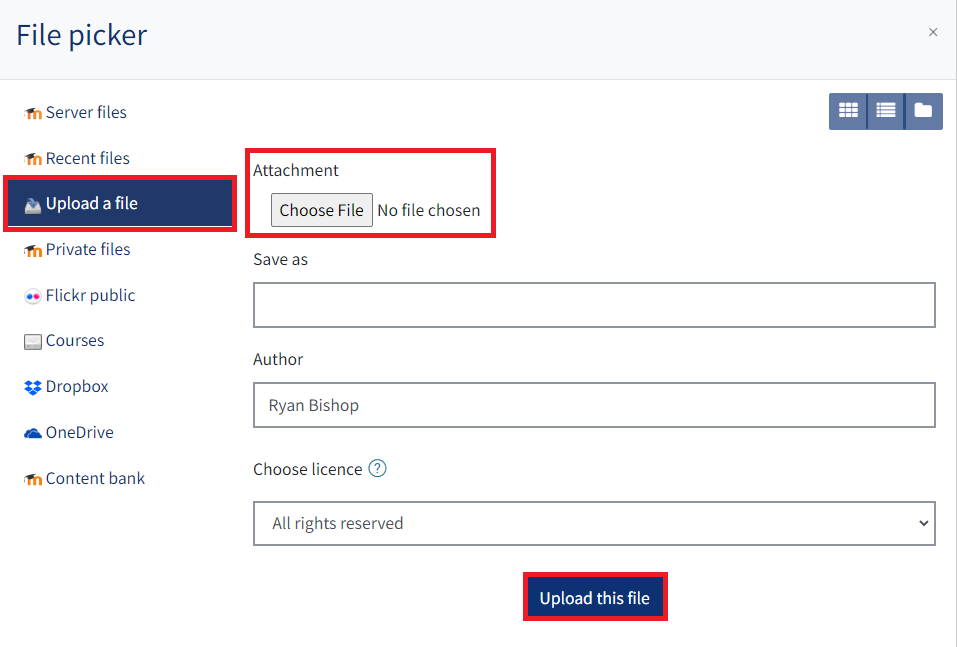
Scroll down the page to User picture and either click on the ‘add file’ icon or drag the file into the drag and drop area.

2. Choose your profile photo file and click Upload this file

Step 4: Update your professional interests and contact details
- Add your professional interests as ‘tags’.
- Add any other contact details useful for other QMplus users.
- Scroll down and click Update Profile.

Updating your Preferences
Click your avatar in the top right corner from the drop-down menu choose Preferences, this allows you to edit your preferences, such as your preferred language, text editor preferences, and message and notification preferences.

Useful Resources
- What is my browser (Website)
- Learn more about home pages (Wiki guide)
- Learn how to access your modules(Wiki guide)