Video assessments
Creating and marking a video assignment
Moving away from traditional essays and reports for assessment, there is increasing interest in allowing students to submit videos as coursework. It is possible to do this on QMplus by using the standard assignment activity and configuring it to allow the submission of a video which has been uploaded to our media server QMplus Media. Students upload their video to QMplus Media and then submit it in a very similar way to a standard essay or report submission.
The full range of tools for grading the video assignment is available including grading forms, rubrics, feedback comments and feedback files. It is also possible to configure the assignment to allow the submission of a video and a report through one submission point…and the report can be submitted to Turnitin if required.
Students will also be able to see their grades and feedback in exactly the same way as for any other assignment, including through Gradesplus.
Why not just get students to upload their video file to QMplus?
You might be wondering why you can’t just use a standard assignment with a file upload for an assignment submission. There are a number of reasons why getting students to use QMplus Media for their videos is a better idea:
- File size – video files tend to be quite large. Having a large number of large files on QMplus can cause a number of issues and so we currently have a 50 megabyte file size limit.
- Reducing technical issues with the submitted video. When students upload a video to QMplus Media, it will be processed into a format which can then be viewed on any device. You don’t need to worry about the video not playing on your computer.
- Access to video creation and editing tools. QMplus Media has a variety of associated tools which students may find useful including :
- An app that makes it easy to upload videos from their phone
- Simple editing tools – including the ability to add interactive hotspots to their video and create a video quiz
- An application that allows them to record screencasts on their own computer
- The ability to share a video with other students to allow them to work on it together
- Auto-captioning – they can request machine generated captions for their video
How to set up an assignment to allow the submission of a video
Setting up your assignment is very similar to setting up any assignment. You add your assignment in exactly the same way.
- Turn editing on and then click on Add an activity or resource in the section where you want the assignment submission point.
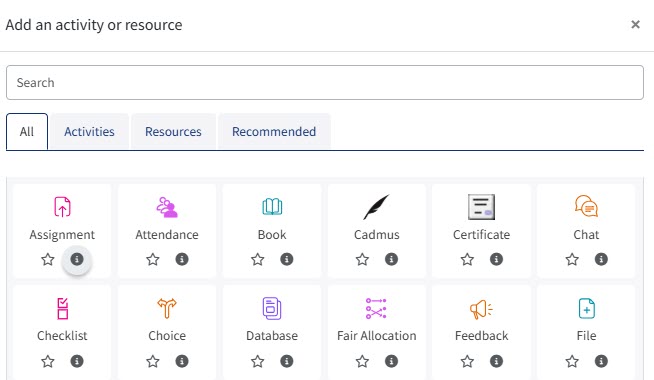
- Select Assignment from the picker.
Specific settings you will need to turn the assignment into a video assignment are:
- Under submission types select online text.

- Under Feedback types – uncheck the Annotate PDF option. Leaving this feature on will not stop the students being able to submit their videos, it helps when you come to mark the assignment.
How to mark a video assignment
You mark the video assignment in exactly the same way as you mark any QMplus assignment. You can use any of the standard QMplus assignment grading methods such as grading forms, rubrics, feedback comments and feedback files.
When you look at the list of submissions, you will see small versions of the submitted videos in the list.
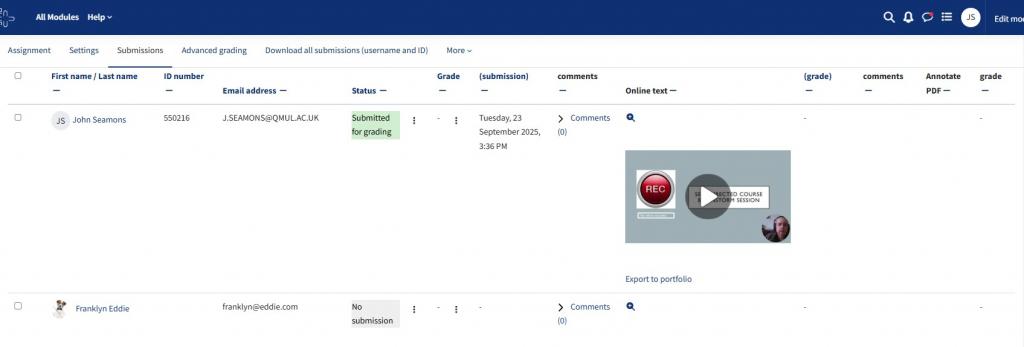
You can click on the Grade button and grade the assignment in the same way as for any other assignment.
Students will see the grade and feedback for their assignment in the same place as for any assignment, for example in Gradesplus.
Tips for video assignments
- As video assignments are slightly different from an average assignment, make sure your students know how to submit them. We have a student guide which we recommend you make your students aware of.
- Remind them that uploading and processing a large video file can take a long time. This is much faster to do when on campus than from home…but they will not be able to submit a video assignment at the very last minute.
The Submission Process for students
Below are the steps the students need to take
- Upload the Video to My Media
- Go to My Media on MyQMUL to upload your video.
- Follow the guidance below.
Set the Video as Unlisted
- Make your video Unlisted so that markers can view it without needing a direct link.
- Follow this guide on how to make your video unlisted.
Enable Video Download
- Ensure the video is downloadable by adjusting the settings on MyQMUL.
- Follow this guide on how to make your video downloadable.
Submit the Video Assignment
- Once these steps are complete, follow the Video Assignment submission guide on MyQMUL to submit your video.
- Video Assignment submission | MyQMUL
Step 1 Uploading a video to your My Media area
Everyone has a My Media area on QMplus where they can upload video content. The content in this area is completely private to you until you choose to share it with others. If you are a member of staff, you might embed your videos into your QMplus module areas to share with your students. If you are a student, your lecturer might ask you to submit your video as an assignment or you might embed your video into a QMplus Hub page.
How to upload your video file
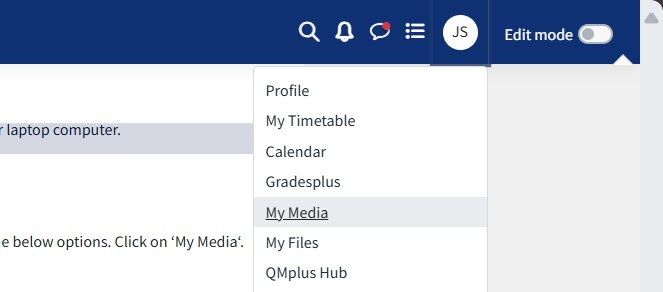
- Log in to QMplus and click on the small white arrow in the top right corner beside your name. This will open a drop menu of the below options. Click on ‘My Media‘.
- You will see your My Media area. If you’ve never uploaded anything before, you won’t see anything listed here. Otherwise you will see a list of all the videos you have uploaded.
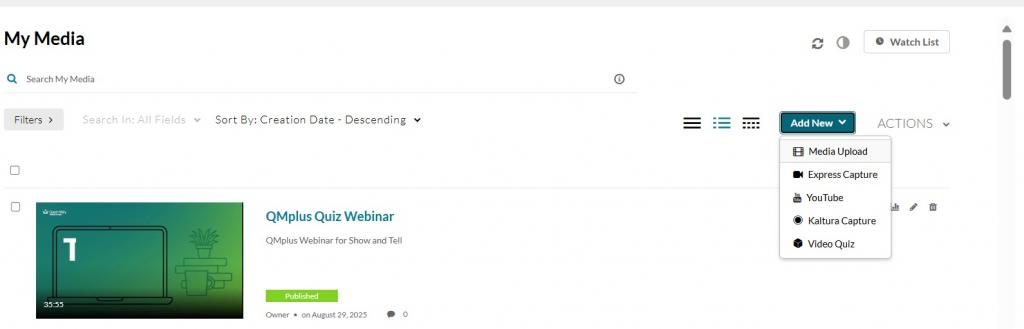
- Click on the Add New button and then select the Media Upload item from the drop down menu.

- Tick the checkbox to accept the terms and conditions.
- It is your responsibility to ensure that you have the right to upload the video content. e.g. You should not download content from the internet and upload it to QMplus unless you are sure that the copyright owner allows for this.
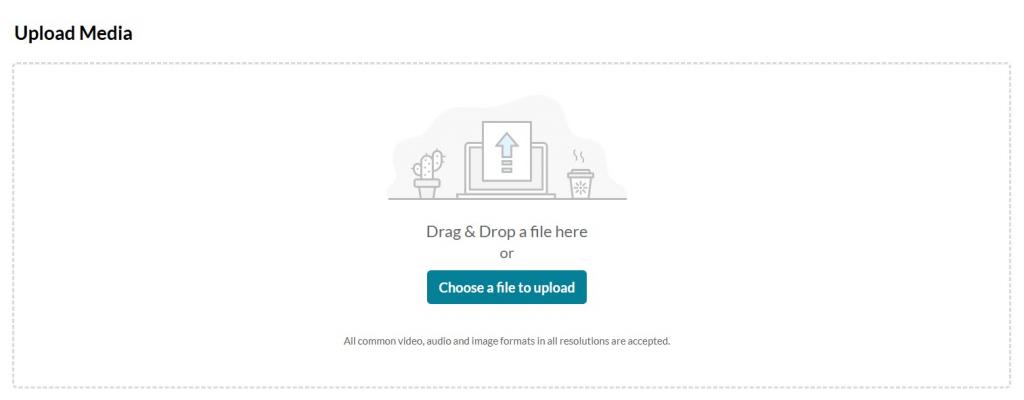
- Now either drag and drop your video file onto the upload area or click the Choose a file to upload button, and find the file you want to upload.
- Your file will start to upload. A blue bar will show you the progress of your upload. Do not leave the page until it has completed successfully.
- Uploading files can take a long time. The time taken depends on the size of the video file and the speed of your internet connection. Please be aware that internet upload speeds are much slower than download speeds. Uploading from a computer on campus is generally much faster from doing it from home. If you are trying to meet a deadline, e.g. for an assignment submission…do not leave this to the last minute!
Adding information about your video
- Once your file has uploaded successfully, you will see an upload completed message.
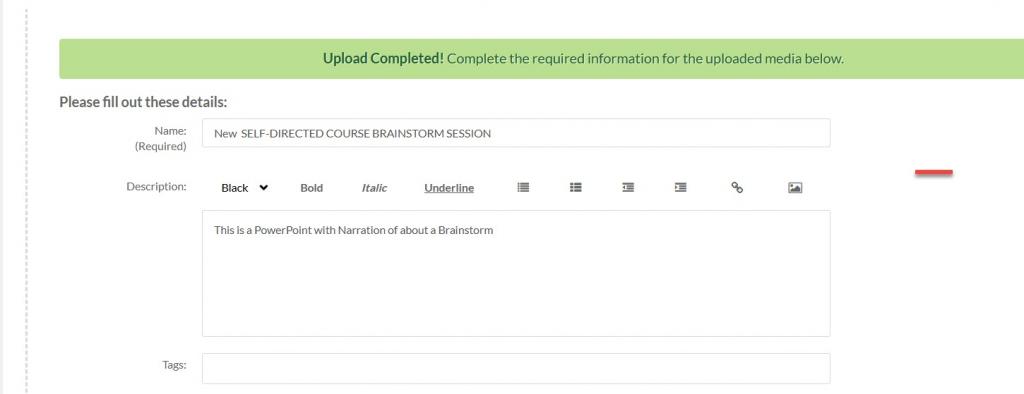
Now you can fill in some information for your video:
- Add a name for your video
- Add a description
- Optional: add some tags for your video. If the video is related to a particular module and you upload videos often, you might want to tag it with the module code.
- Adding this information to this video is useful for you when you want to search for particular media content that you have uploaded and is also useful for those that you might share your video with.
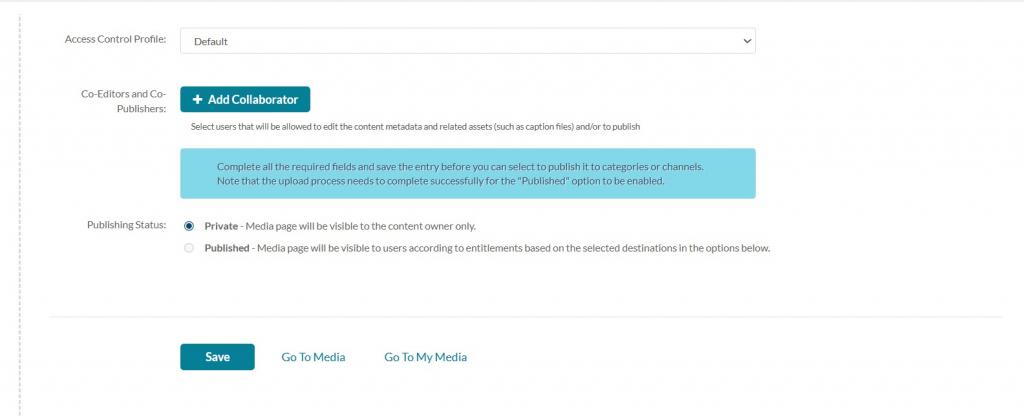
- There are a few more fields you can set before saving your upload. These can also be changed after your upload is complete.
4. You’ll only want to change the access control profile if the media being uploaded will need to be viewed by users that are not signed in. For example on public websites outside of QMUL. Otherwise this should be left at the default option.
5. If you’d like someone else to have access to edit and/or publish your video, you may use the Add Collaborator button.
- Once you have entered all the information, scroll down, click Save (you will see a confirmation message) and then click on the Go to My Media link.

- You will now see your newly uploaded video listed in your My Media area.
- If you have uploaded a large video, you may see a message saying Media processing. This means that the system is processing your video and it is not ready to view yet. This is the same thing that happens when you upload a video to YouTube, the video file has to be processed before it can be viewed. The processing usually happens very quickly without any issues.
- Note: In rare cases you may find that your video fails to process and you will see an error message. In this case you should try your upload again. If the error persists, raise a ticket on the Helpdesk for support.
Important: If you are using the video for an assessment, you are responsible for ensuring that your video has processed successfully before you submit it. Be sure to leave yourself enough time for uploading and processing your file.
Tips for uploading video
- As we have highlighted throughout this guide, there are a number of things you need to be aware of:
- Try to produce video files that are as small as possible. Does the video need to be in high resolution? If not, use a lower resolution and you will get a smaller file size.
- Uploading video files can take a long time. This depends on the size of the file and your internet connection speed. Uploading files to the internet is always slower than downloading them. As a rough guide, the average broadband upload speed (at the time of writing) is around 6Mbps, uploading a 100MB file at this speed would take roughly 2 and a half minutes. Uploading a 1GB file would take around 30 minutes.
- Uploading the file is only one part of the process. You need to ensure that the file you have uploaded then processes successfully. Processing errors are rare but can happen. Allow yourself plenty of time to upload your file and ensure it processes successfully particularly if your video is going to be used as part of an assessment
- Step two set the Video as Unlisted
- Make your video Unlisted so that markers can view it without needing a direct link.
- Follow this guide on how to make your video unlisted.
- Step three set Enable Video Download
- Ensure the video is downloadable by adjusting the settings on MyQMUL.
- Follow this guide on how to make your video downloadable.
- Step four Submit the Video Assignment
- Once these steps are complete, follow the Video Assignment submission guide on MyQMUL to submit your video.
- Video Assignment submission | MyQMUL