Zoom Recordings
Record a meeting
Zoom provides the ability to record all ad-hoc and scheduled online meetings. This can be particularly useful for sharing recordings with those unable to attend live, for participants need to review meeting discussions, or to archive teaching content for future use.
Sessions can be recorded to the host’s PC as a local file or automatically uploaded to the cloud, which is available for users to stream at any time. Cloud recordings are also automatically transferred to your QMplus Media account, so they can easily be shared or embedded within a QMplus module. You also have the ability to make basic edits to recordings, which may be useful for removing content like an informal discussion at the beginning of a session.
To start recording during a meeting, click the Record button at the bottom of the meeting window and select Record on this Computer to create a local recording or Record to the Cloud to automatically upload the recording to your online Zoom account. Cloud recording is recommended in most cases, as the files are automatically backed-up online. Meetings can be configured to record automatically once the host joins the session. For more information, please see the 'Meeting Options' section of our Zoom Scheduling guide.

Once the recording has been started, Pause/Stop Recording controls will appear. You can pause and resume the recording throughout the session. Click Stop to end the recording. Stopping and starting another recording in the same meeting will create a separate recording file.

You will see a visual indication at the top of the meeting window when a recording is running or paused. You can pause and resume the recording using the buttons to the right side of this notification.
![]()
Download and manage recordings
Manage local recordings in Zoom desktop client
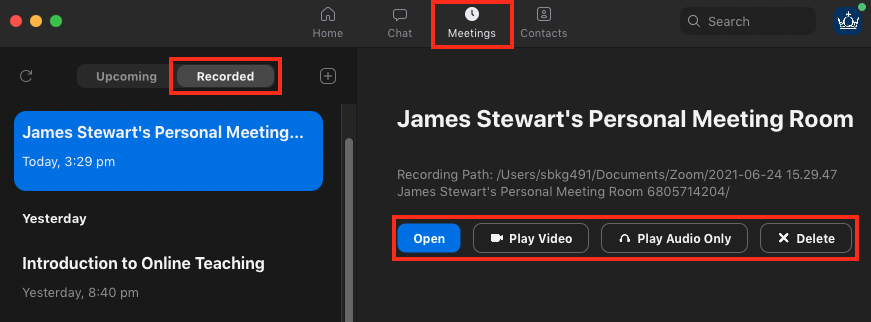
If you choose to record locally on your PC, the video files can be managed using the Zoom desktop client on your PC. To manage local recordings, open the Zoom desktop client and click on the Meetings tab at the top of the window. From this screen, select Recorded which will display a list of your recorded sessions. With the recording selected, you can Open the file on your computer, play the video or audio, and delete the recording from your PC.
Manage cloud recordings in Zoom
If your session was scheduled via the QMplus External Tool (click here for more information), recordings can be managed by opening the Zoom link on your module page.

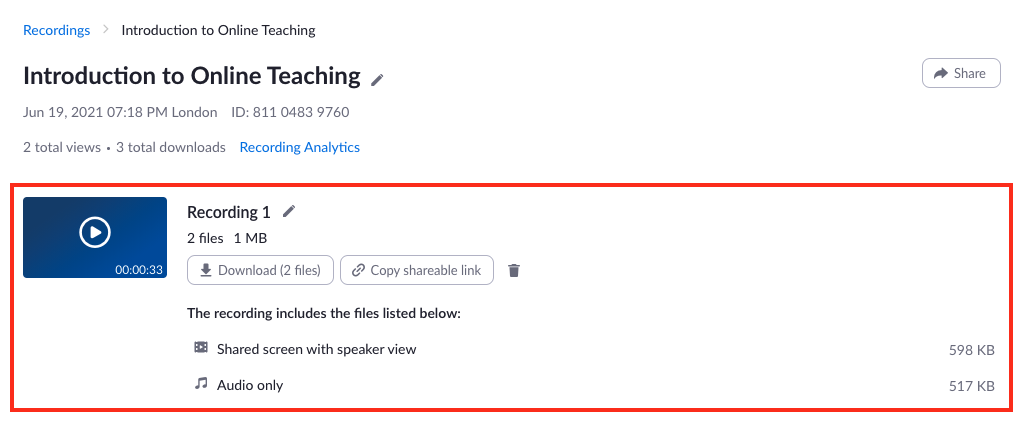
Cloud recordings can also be managed in your Zoom account. From this page, you can click the title of the recording to open the recording information page.
Clicking the title of the recording in your account will open the recording information page . From this page you can view the recording, download a copy as a local file, retrieve a sharable link, and delete the recording from your Zoom library.
Manage cloud recordings in QMplus Media
QMplus media is integrated with Zoom, so all Cloud recordings are automatically transferred to your QMplus account. It will take some time for recordings to finish processing and transfer to QMplus Media, so take this into consideration depending on the length of the recording. You can access your media library via the QMplus Dashboard using the My Media link, or you can log in to QMplus Media directly at this link. Click Guest at the top of the screen, click Login, and enter your username and password.
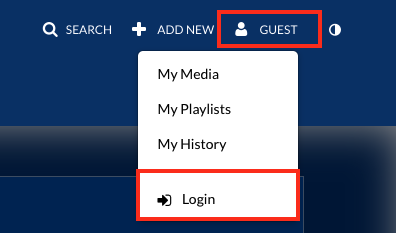
Once logged in, click your name at the top of the screen and select My Media.

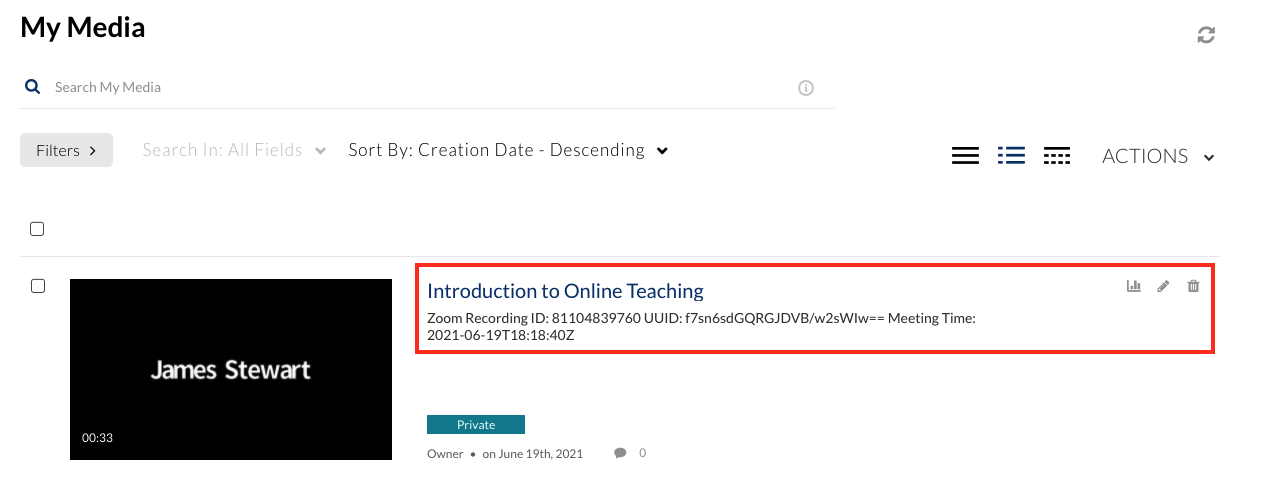
Zoom recordings will be listed on your My Media page, displaying a Zoom Recording ID and the date and time of the session. Click the title of a recording to view it.
To publish and share a link to your recording, scroll down to the Actions menu and select Publish.

Select the button beside Unlisted and click Save to allow anyone with a shared link to view the recording.

When the page refreshes, click Share and copy the displayed link to share with viewers.

If you would like to securely embed your recording in a QMplus page, visible only to those enrolled on a module, view this guide for adding a QMplus Media video to a QMplus area.
Return to top
Sharing a recording
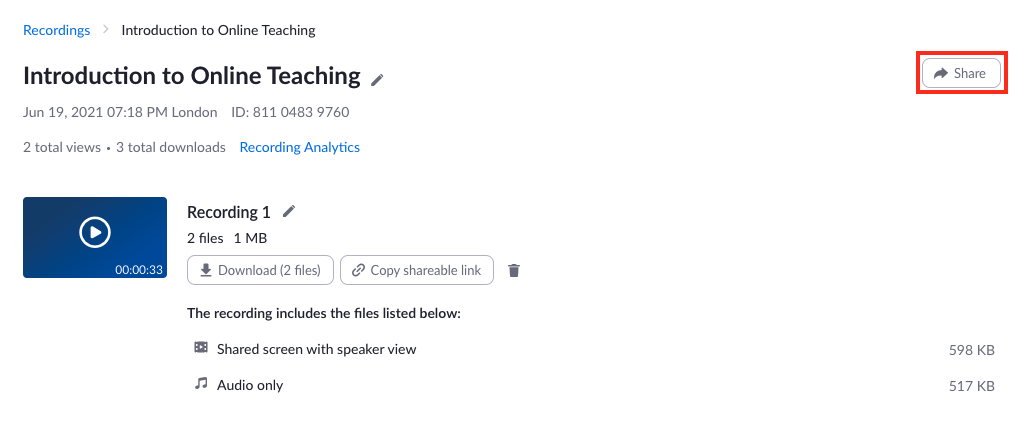
Click the Share button to configure sharing settings.
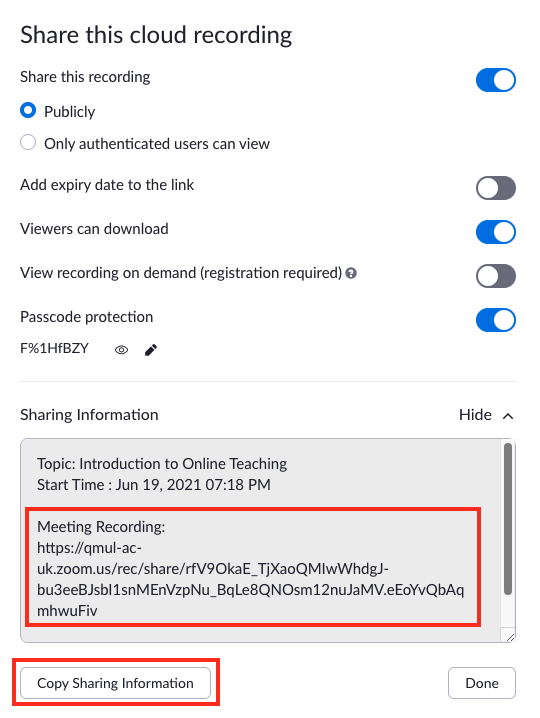
From the Share window, the recording can be made publicly available, restricted to QMUL users, available to download, or passcode protected. Once the settings have been adjusted, copy the access link from the Sharing Information field, or click Copy Sharing Information to add all of the sharing details to your clipboard.
Editing recordings
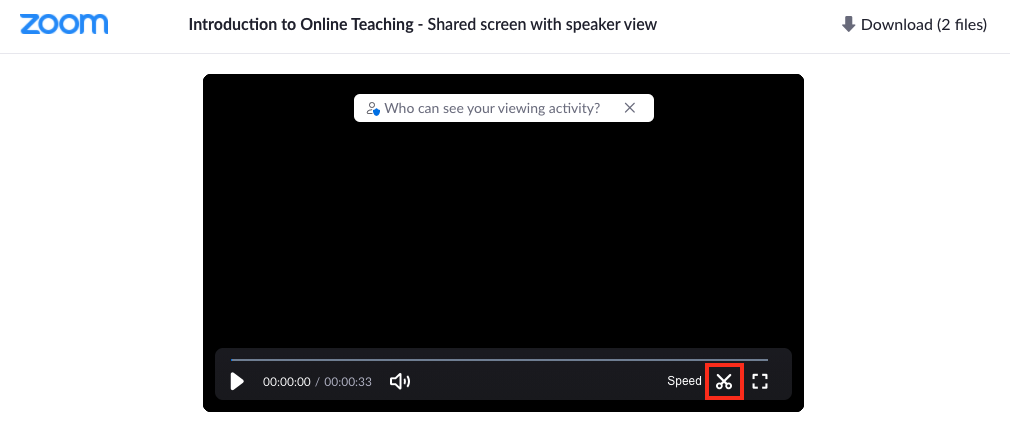
Basic editing options are available in Zoom, allowing you to set a custom start and end point for the recording. From the recording information page, click the video thumbnail (‘play’ icon) to view the recording. To begin editing, click the scissors icon at the bottom of the player.
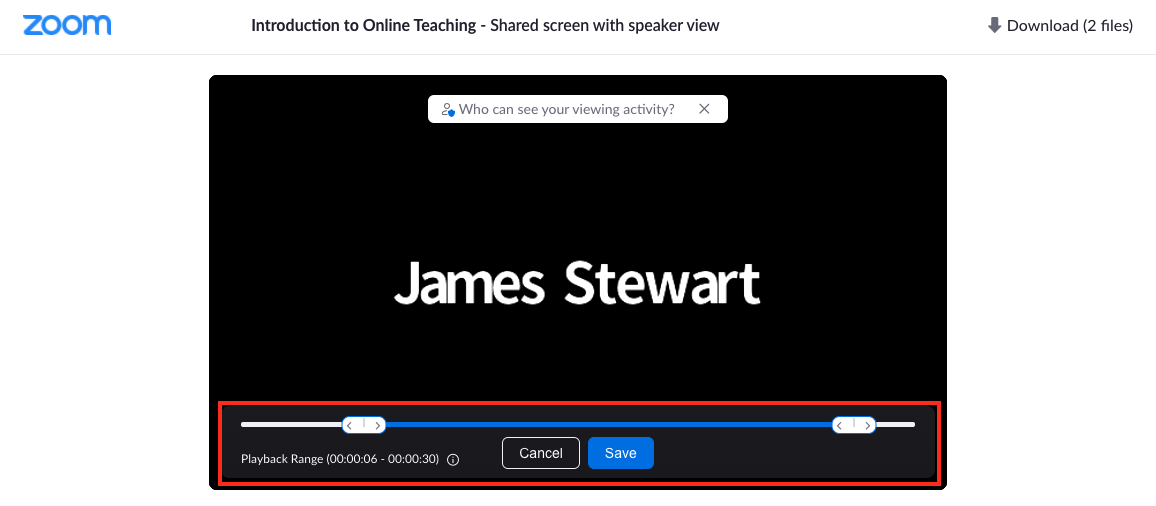
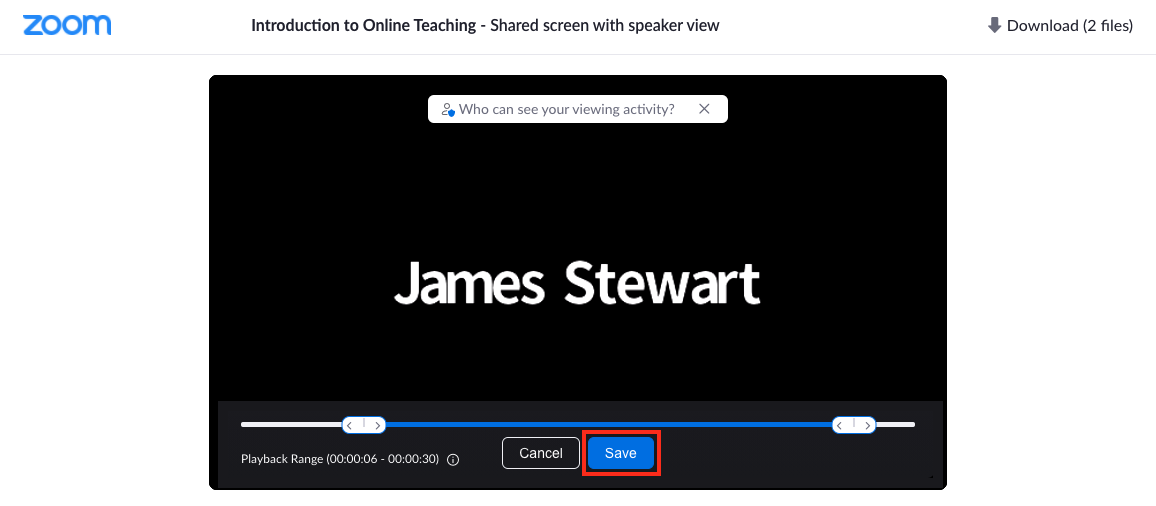
Please note: You are unable to edit sections from the middle of the recording in the Zoom editor. If you need to make more advanced edits, view this guide on editing recordings in QMplus Media. Zoom cloud recordings will be automatically available in your QMplus media library.
Recording configuration settings
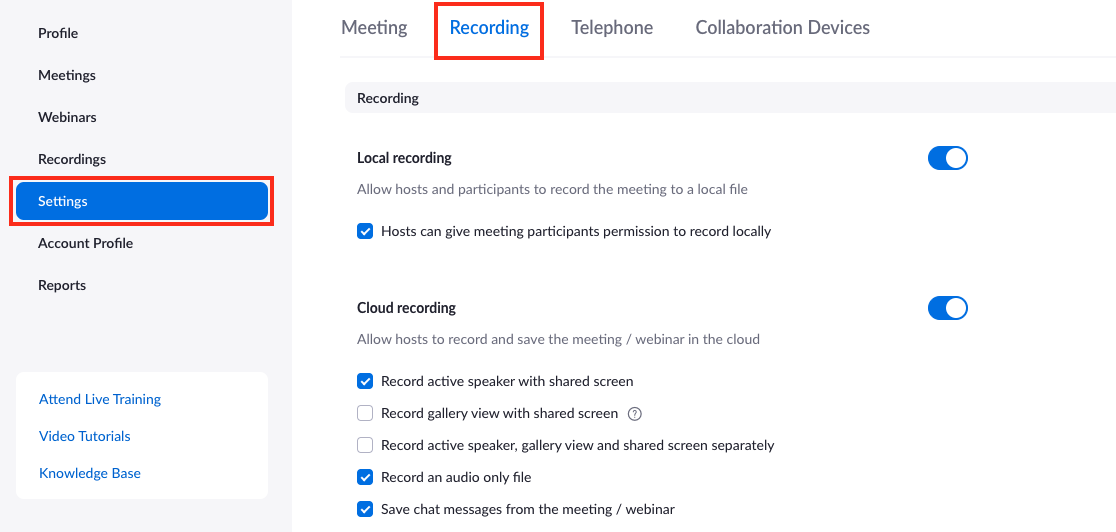
Zoom recordings can be configured in your Zoom account by clicking Settings in the menu and selecting the Recording tab. This section will highlight a few notable settings. However, you may want to review all available settings if you have specific requirements for your recordings.
Local recording allows hosts and participants make their own recordings during your meeting. You may want to disable the features if you want to control who can record the session.
Under Cloud recording you can adjust what gets captured by the recording, and whether you would like the active speaker, gallery view, and shared screen recorded separately. You can also choose whether to save the Chat transcript from meetings.
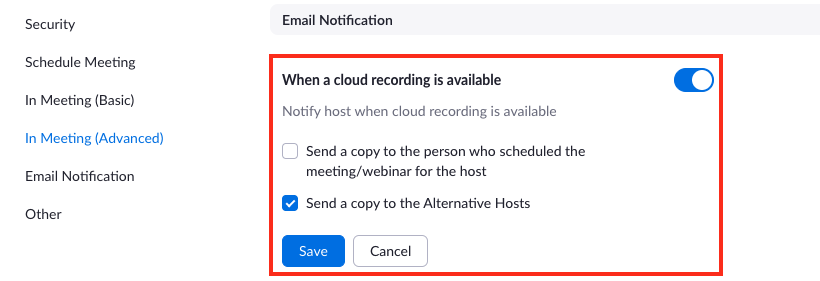
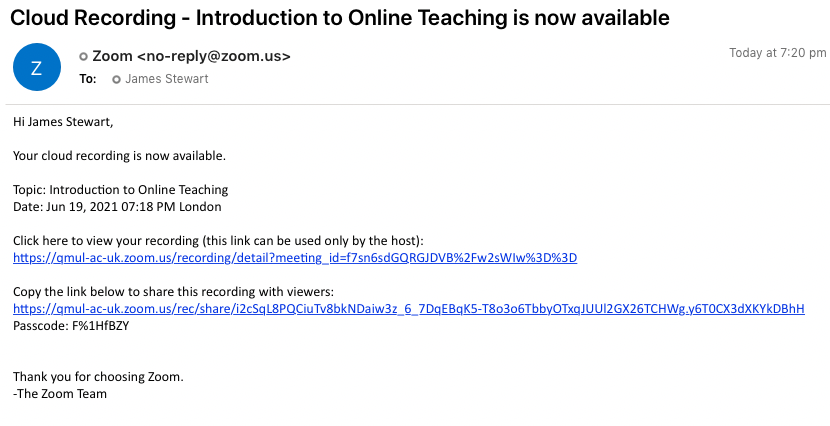
By default, you will receive an email notification when a cloud recording is available to view and share. You can also enable these notifications for any Alternative Hosts (if you would like a Co-Host to help you manage recordings) by clicking Settings in the account menu, select the Meeting tab and scroll down to Email Notification and tick the box Send a copy to the Alternative Hosts. Click Save.
Zoom recordings and the QMplus Media/Kaltura player
Recordings stored in the cloud in Zoom are automatically transferred to QMplus Media/Kaltura. They are visible in your My Media area and you can use all of the Kaltura features such as auto-captioning, chaptering and editing as well as publishing them in QMplus or on websites.
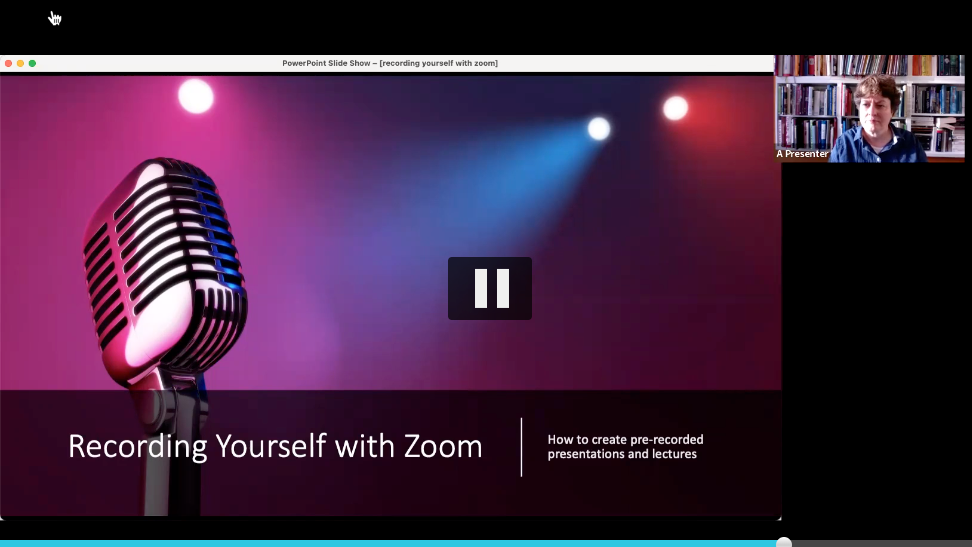
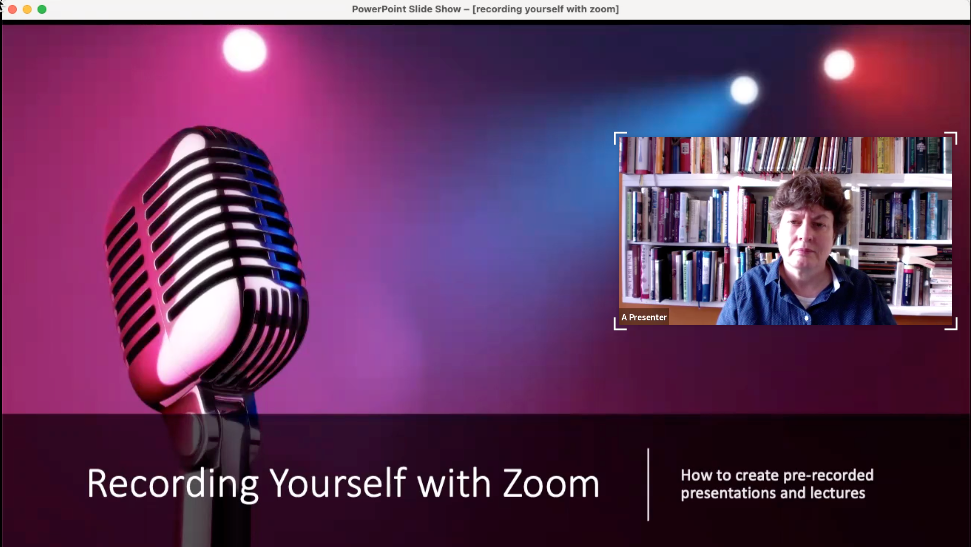
You can also take advantage of the Kaltura video player which allows your viewers to customise how they view your video. Resizing or moving the picture in picture window or choosing to view just the presentation, or just the speaker. Whatever works best. This can be particularly useful if you are using Zoom to create pre-recorded lectures or presentations.
This guide describes how to set your recording settings in Zoom to take advantage of this feature.
What Zoom recordings look like on QMplus Media/Kaltura
By default, when zoom recordings transfer to QMplus, the speaker appears as a small fixed picture-in-picture.
How to change your Zoom recording settings
To change your Zoom recording settings: Log in to Zoom on the web Navigate to Settings > Recording and then go to the Cloud recording section.
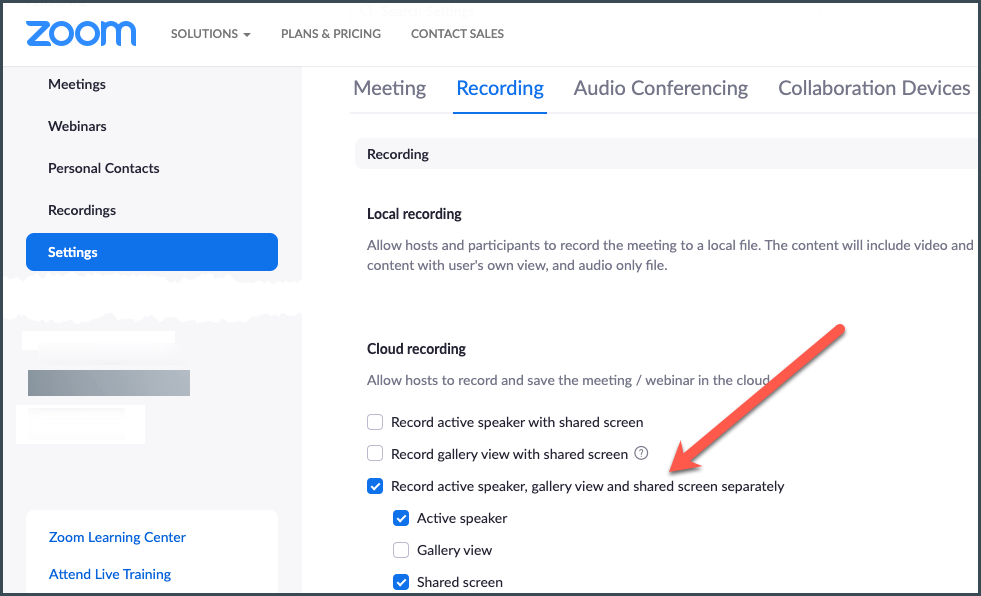
- Check the Record active speaker, gallery view and shared screen separately option.
- Check the boxes for Active speaker and Shared screen
- Select Save
Return to top