My Media
What is My Media
Everyone has a My Media area on QMplus where they can upload video content. The content in this area is completely private to you until you choose to share it with others. If you are a member of staff, you might embed your videos into your QMplus module areas to share with your students. If you are a student, your lecturer might ask you to submit your video as an assignment or you might embed your video into a QMplus Hub page.
Note: we assume that you already have the video file that you want to upload and that you are uploading from a desktop or laptop computer. It is also possible to upload videos from mobile phones, please see our guide on using the QMplus Media app for that.
How to upload your video file
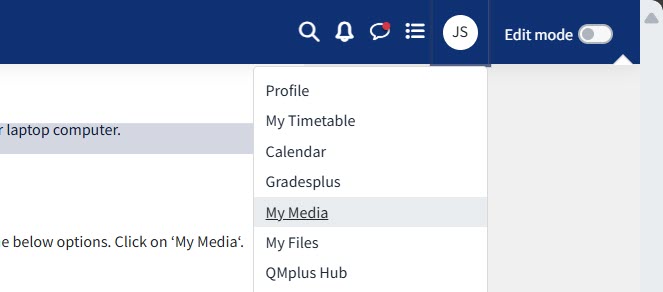
- Log in to QMplus and go to your dashboard.
- Click on the My Media link.
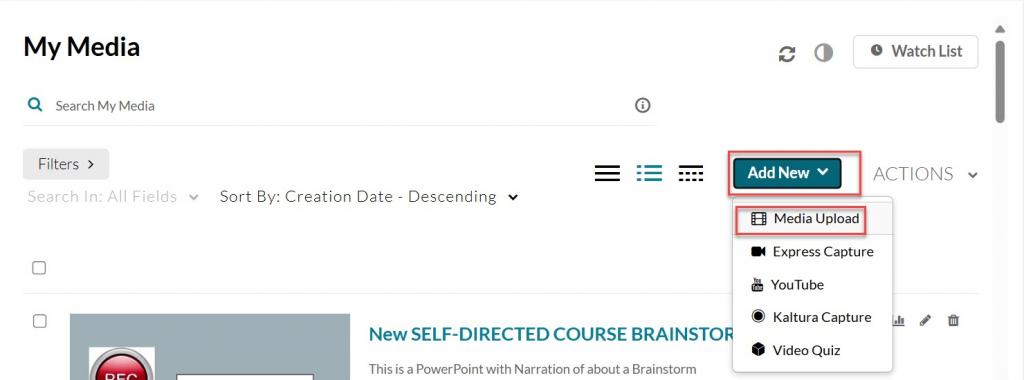
- You will see your My Media area. If you’ve never uploaded anything before, you won’t see anything listed here. Otherwise you will see a list of all the videos you have uploaded.
- Click on the Add New button and then select the Media Upload item from the drop down menu.
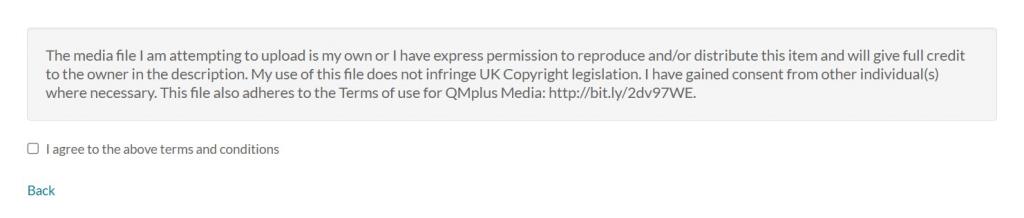
- Tick the checkbox to accept the terms and conditions. It is your responsibility to ensure that you have the right to upload the video content. e.g. You should not download content from the internet and upload it to QMplus unless you are sure that the copyright owner allows for this.
- Now either drag and drop your video file onto the upload area or click the Choose a file to upload button, and find the file you want to upload.
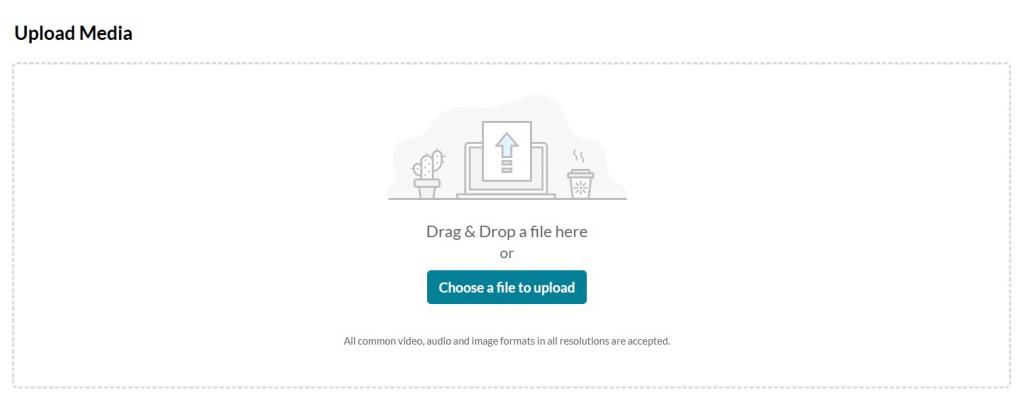
- Your file will start to upload. The bar will show you the progress of your upload. Do not leave the page until it has completed successfully.
- Uploading files can take a long time. The time taken depends on the size of the video file and the speed of your internet connection. Please be aware that internet upload speeds are much slower than download speeds. Uploading from a computer on campus is generally much faster from doing it from home. If you are trying to meet a deadline, e.g. for an assignment submission…do not leave this to the last minute!
- Once your file has uploaded successfully, you will see an upload success message.
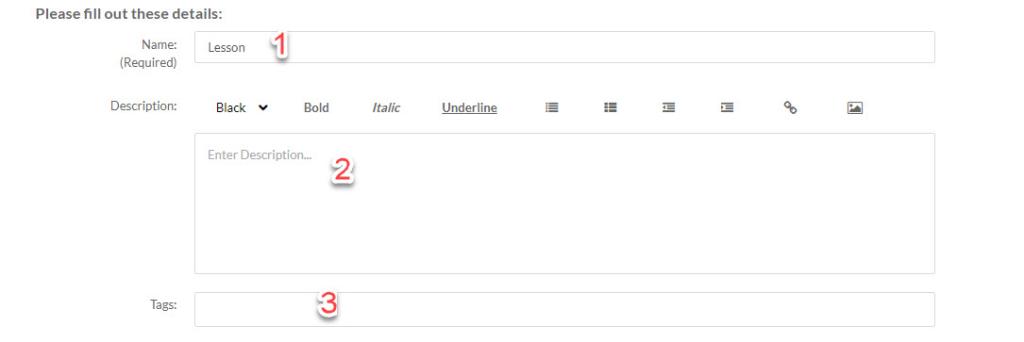
Now you can fill in some information for your video:
1- Add a name for your video
2- Add a description
3- Optional: add some tags for your video. If the video is related to a particular module, you might want to tag it with the module code.
Adding this information to this video is useful for you when you want to search for particular media content that you have uploaded and is also useful for those that you might share your video with.
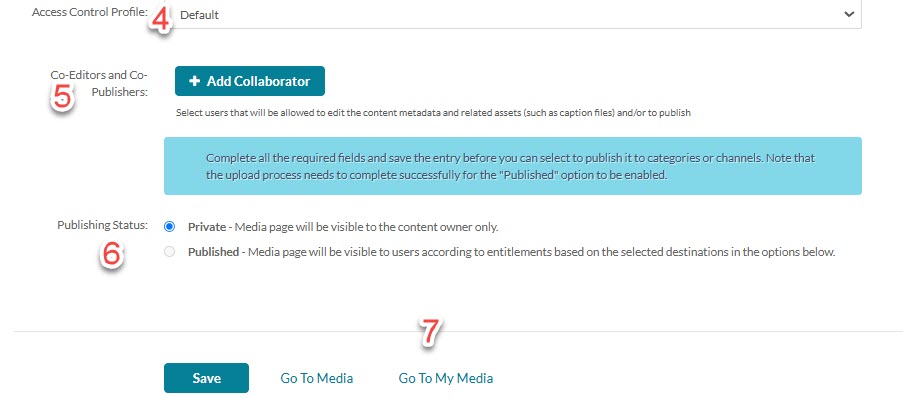
4- The Access control panel can be set to default or public. The default profile restricts access to authenticated users within a specific organization or institution. The public profile allows unrestricted access, making media viewable by anyone with the link, regardless of login status.
5- You have the option to add collaborators as co-editors and publishers so they have access to edit elements of the media.
6- The publishing status can be private or published. If private it will only be available to yourself as creator or published where the entitlements are based on a destination you choose such as a course.
7- Once you have entered the information, scroll down and click on the Go to My Media link.
You will now see your newly uploaded video listed in your My Media area.
- Please note: If you have uploaded a large video, you may see a message saying Media processing. This means that the system is processing your video and it is not ready to view yet. This is the same thing that happens when you upload a video to YouTube, the video file has to be processed before it can be viewed. The processing usually happens very quickly without any issues. In rare cases you may find that your video fails to process and you will see an error message. In this case you should try your upload again. If the error persists, raise a ticket on the Helpdesk for support.
- If you are using the video for an assessment, you are responsible for ensuring that your video has processed successfully before you submit it. Be sure to leave yourself enough time for uploading and processing your file.
Making video downloadable
This maybe particularly useful if you are a student submitting a video Assignment. Learn how to make a video downloadable.
Tips for uploading video
As we have highlighted throughout this guide, there are a number of things you need to be aware of:
- Try to produce video files that are as small as possible. Does the video need to be in high resolution? If not, use a lower resolution and you will get a smaller file size.
- Uploading video files can take a long time. This depends on the size of the file and your internet connection speed. Uploading files to the internet is always slower than downloading them. As a rough guide, the average broadband upload speed (at the time of writing) is around 6Mbps, uploading a 100MB file at this speed would take roughly 2 and a half minutes. Uploading a 1GB file would take around 30 minutes.
- Uploading the file is only one part of the process. You need to ensure that the file you have uploaded then processes successfully. Processing errors are rare but can happen. Allow yourself plenty of time to upload your file and ensure it processes successfully particularly if your video is going to be used as part of an assessment.