School home pages
- Have an existing home page or a QMplus area you would like to make into a home page
- Have admin/editing access to your home page
- Have a basic understanding of HTML and CSS (not obligatory but very helpful)
The advantages of home pages are:
- They provide a connection between the modules/courses that our students are taking and the programme/school or institute they are studying in.
- They enable communication of key information to all staff and students in your school.
Features of a home page
How do the ‘My home’ pages work?
The first time someone logs in to QMplus, the system will attempt to determine which page should be used as their home page. This is done by looking at what the user is enrolled on in QMplus and whether there is a home page for that part of QMplus. e.g. if a student is enrolled in a number of modules which are all within the School of Economics and Finance category and there is a home page for that category, they will be automatically assigned that page as a home page. Note: the page the user always sees first when logging in is their ‘dashboard’. The home page functions as the main information page for their module and is accessed via the navigation drawer as shown above.
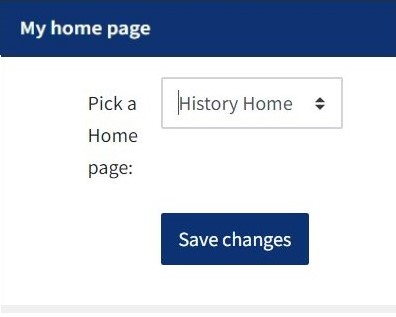
If QMplus finds more than one home page for the user, i.e. if they are enrolled on modules from different parts of QMUL, they will be asked to choose which page they would prefer to use as their module home page. They will be able to change this choice by using the home page selection block which will appear in the site-wide information column – point 6 in the screenshot above. This block only appears the first time you log in when you have more than one module to choose from. It can be recognised as per the following image. All your module options are shown on the ‘Pick a Home page’: drop-down menu.
A good example of this is Associate students who may take modules in different schools. They will be able to set one school as their home page but will easily be able to go to the home page for the other school by using the ‘My home page’ block.
If QMplus cannot find an appropriate home page for the user, they will be assigned the QMplus default ‘My home’ page.
Once set, the user will be taken to their home page on all subsequent logins. Clicking on the “My home” icon or the QMplus logo will take them to their home page.
How to change your home page
If you need to change your home page you can also do this by editing your profile, using the following steps:
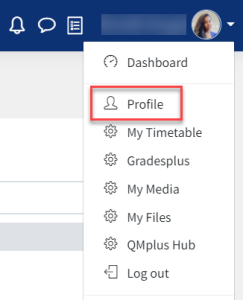
- Open the actions menu by clicking the small white arrow beside your name in the top right of any page, then click ‘Profile’.
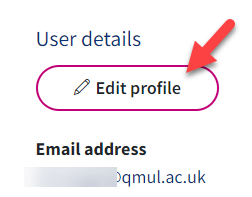
- At the top left of your profile page, click the ‘Edit profile’ button to make changes.
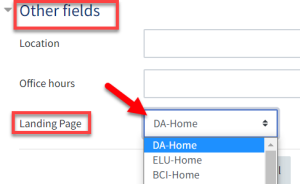
- Scroll down to the ‘Other fields’ section and click on it to reveal the ‘Landing Page’ option. Click the drop down list to select your desired school home page.
Don’t forget to click the ‘Update Profile’ button at the end of the page to save your changes.
Adding content
Add a heading and text

- Add a heading by either clicking on the pencil icon – adding a heading and pressing enter
- Add an activity or resource to the section
- You can also edit the heading by selecting edit > edit section
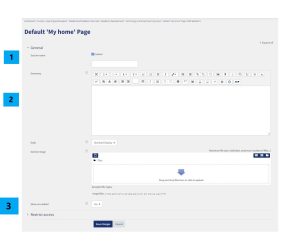
- Check ‘Custom’ and then type your heading into the ‘Section name’ textbox
- Now you can add content, and maybe an image, to the ‘Summary’ section and format it as you wish
- Decide if you want to display the block on mobile devices
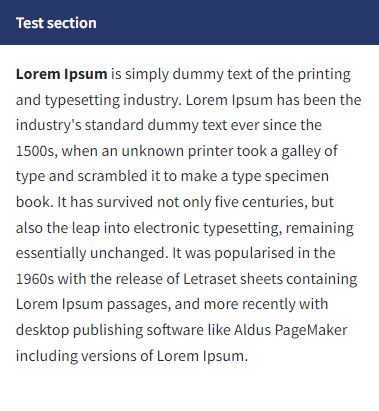
Save your changes – Your new section might look like this:
Adding an image header
You can add an image to your content that will extend to the borders of the section. You might use this for banners or to profile something happening in your school. You can also add a heading and content if you wish. These will appear underneath the image.
Step 1: Follow the same steps as ‘Adding header and text’ above
Step 2: Under ‘Section image’ – click the folder icon and upload an image following the same steps as previously mentioned (Basic text with small image)
Step 3: Under ‘Style’ Select ‘Image header’
Step 4: Save changes
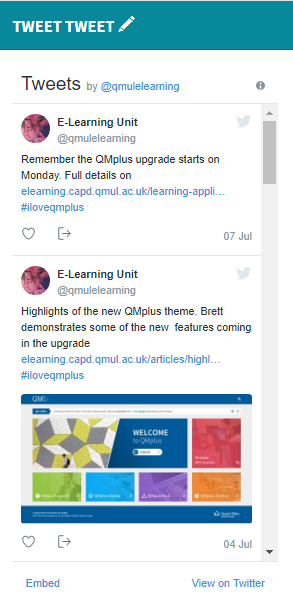
Adding external content
You can also add a Twitter feed or Facebook feed to your section.
Step 1: Get the embed code from your external site: Twitter/Facebook/RSS feeds
Step 2: Paste the embed code in HTML Mode
Step 3: Switch back to visual mode
Step 4: In these situations you would be advised to select NOT to display the content on a mobile device
Step 5: save changes
Your section might look something like this:
Adding resources
You can also add resources to your page using the standard file picker.
How to use the new features and styling options
The QMplus look and feel is built on a framework known as Bootstrap 4. This means that it is possible to use some of the components of this underlying framework to style parts of QMplus pages. This section provides some examples of how you can style buttons and links.
Simple buttons
You can add styling to hyperlinks in your content to make them look like buttons.
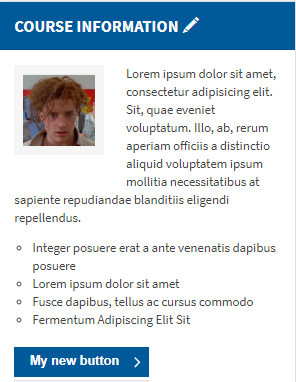
In this example, My new button is a hyperlink which has been styled to look like a button. To do this, you need to apply a particular CSS class to your hyperlink.
- Open your content section in edit mode
- Navigate to the place where you would like to place your button: Type a label for your button in my case it is ‘My New Button”
- Add the hyperlink to your button, you can use the link tool or you can write in HTML if you prefer.
- Open your content in ‘HTML’ mode (<>) and add the following code to the link tag: class=”btn btn-primary” So now my URL looks like this: <a href=”add full URL here” target=”_blank” class=”btn btn-primary”>My new button</a>
Other button colours are possible:
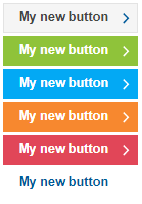
Just substitute the CSS classes in bold below:
Grey button:
<a href=”http://www.bbc.co.uk” target=”_blank” class=”btn btn-secondary”>My new button</a>
Green button:
<a href=”http://www.bbc.co.uk” target=”_blank” class=”btn btn-success”>My new button</a>
Light blue button:
<a href=”http://www.bbc.co.uk” target=”_blank” class=”btn btn-info”>My new button</a>
Orange button:
<a href=”http://www.bbc.co.uk” target=”_blank” class=”btn btn-warning”>My new button</a>
Red button:
<a href=”http://www.bbc.co.uk” target=”_blank” class=”btn btn-danger”>My new button</a>
Clear button:
<a href=”http://www.bbc.co.uk” target=”_blank” class=”btn btn-link”>My new button</a>
Outline buttons
Alternatively if you don’t want buttons with a ‘fill’ you might prefer outline buttons. These can be particularly useful where you have used a background fill:
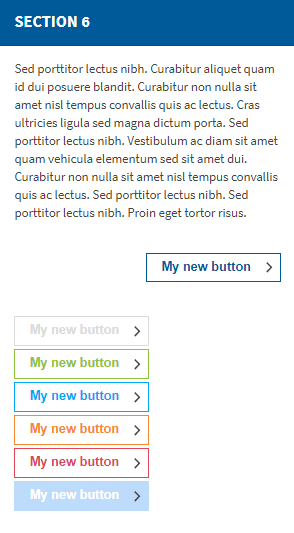
To achieve these effects, use the CSS classes below:
Blue outline right aligned:
<p style=”text-align: right;”><a href=”http://www.bbc.co.uk” target=”_blank” class=”btn btn-outline-primary”>My new button</a></p>
Grey outline:
<a href=”http://www.bbc.co.uk” target=”_blank” class=”btn btn-outline-secondary”>My new button</a>
Green outline:
<a href=”http://www.bbc.co.uk” target=”_blank” class=”btn btn-outline-success”>My new button</a>
Light blue outline:
<a href=”http://www.bbc.co.uk” target=”_blank” class=”btn btn-outline-info”>My new button</a>
Orange outline:
<a href=”http://www.bbc.co.uk” target=”_blank” class=”btn btn-outline-warning”>My new button</a>
Red outline:
<a href=”http://www.bbc.co.uk” target=”_blank” class=”btn btn-outline-danger”>My new button</a>
Blueish outline:
<a href=”http://www.bbc.co.uk” target=”_blank” class=”btn btn-outline-link”>My new button</a>
Large buttons and small buttons
You might want to add a large button or a small one:
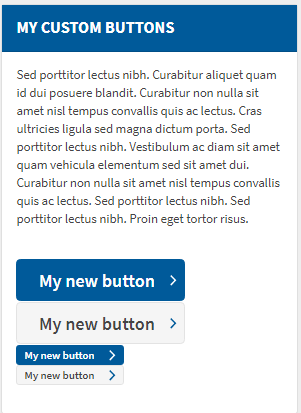
Large button (theme colour):
<a href=”http://www.bbc.co.uk” target=”_blank” class=”btn btn-primary btn-lg”>My new button</a>
Large button inverse:
<a href=”http://www.bbc.co.uk” target=”_blank” class=”btn btn-secondary btn-lg”>My new button</a>
Small button (theme colour):
<a href=”http://www.bbc.co.uk” target=”_blank” class=”btn btn-primary btn-sm”>My new button</a>
Small button inverse:
<a href=”http://www.bbc.co.uk” target=”_blank” class=”btn btn-secondary btn-sm”>My new button</a>
Block level buttons
Block level buttons are buttons which will automatically expand widthways to fill their container.
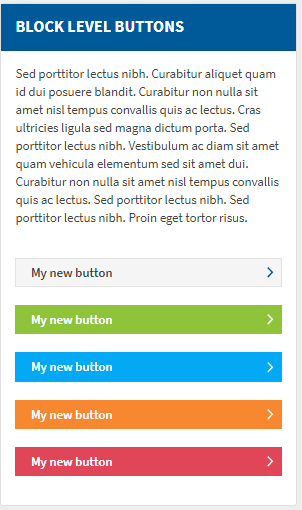
Use the following CSS classes to achieve these effects:
Grey :
<a href=”http://www.bbc.co.uk” target=”_blank” class=”btn btn-secondary btn-block”>My new button</a>
Green:
<a href=”http://www.bbc.co.uk” target=”_blank” class=”btn btn-success btn-block”>My new button</a>
Light blue:
<a href=”http://www.bbc.co.uk” target=”_blank” class=”btn btn-info btn-block”>My new button</a>
Orange:
<a href=”http://www.bbc.co.uk” target=”_blank” class=”btn btn-warning btn-block”>My new button</a>
Red:
<a href=”http://www.bbc.co.uk” target=”_blank” class=”btn btn-danger btn-block”>My new button</a>