The sharing cart
Enabling the sharing cart
The sharing cart is a QMplus block. Once you have added it to a page, it becomes your sharing cart and you will see it on every page where you have editing access. Students and other staff members will not be able to see your personal sharing cart.
To add the block, turn Edit mode on, using the toggle button in the top right of the screen.

Next, click on the 'Add a block' option in the top of the right panel that displays in the block drawer. You may need to open the block drawer using the left pounding arrow in the top right of the page.


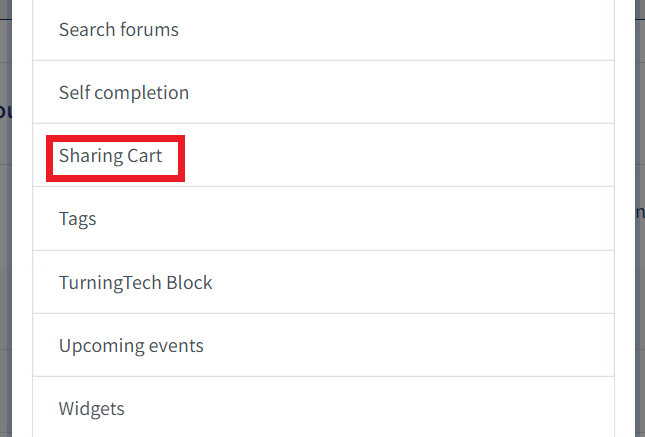
Scroll down and select ‘Sharing Cart’ from the pop up menu.

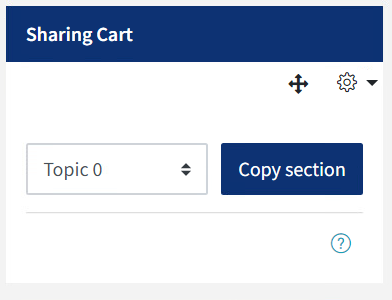
Once you have selected the block, it will appear on the right hand side of the page in the block drawer. You may need to scroll down to find it.

Putting items into your cart
Once you have enabled the sharing cart block, you will find that individual items and whole sections in your QMplus area have a Shopping Basket icon. To copy the item into your cart, click this icon.

You will see the item (labelled as '1') appear in your sharing cart block.

If you have copied a whole topic (labelled as '2'), this will appear as a folder in your sharing cart. You can click on the folder to see the contents. You can also copy a whole topic by selecting it in the drop down menu (labelled as '3') in the sharing cart block and clicking on the Copy section button.
Depending on the type of item you are copying you may be asked whether you wish to copy user data. For example, if you have used a glossary activity to allow students to build a shared resource, you can choose to copy that activity, along with all the entries, into another QMplus area where it can continue to be built on.
Copying items out of your cart
To copy items from your cart into another QMplus area, navigate to the appropriate area and turn editing on as explained previously. You will see the sharing cart block with all of your content in it. Click on the copy icon next to the item in your cart which you wish to copy.

You will see some rectangles with dotted lines appearing in various places in your QMplus area. These indicate where you can put your copied item.
.png)
Click on the place you wish to copy the item to. It is only possible to place the item at the end of a topic, if you don’t want it there, you will have to move it after copying it.
If you have chosen to copy a whole topic, you will be asked what name you want to use for the topic. If you want to copy individual items from a topic instead of the whole topic, click the folder to open it and then select the copy icon next to the item you want to copy.

Cancelling a copy
If you’ve clicked the copy icon but then decide you don’t want to complete the copy process, you can cancel it by using the icon that you will find at the top of the course page.

Deleting items from your cart
When you have finished copying your content from one place to another, we recommend that you delete the items from your cart completely. Your sharing cart takes up storage space and we may run into difficulty if multiple users are storing large amounts of data in their cart.
You can delete individual items by clicking the trash can icon next to them.

Bulk deleting
You can also bulk delete items from your sharing cart by clicking on the cog icon and selecting the Bulk delete option.
You can then select the items you want to delete…or choose to delete everything.

Organising your cart
There are a couple of features which allow you to organise your sharing cart:
- You can re-order items in the list
- You can put items into folders
Clicking the vertical arrow, the Move icon allows you to move an item to a different position in the list of items.

- You can then click where you wish to move the item to by selecting the 'Click to move here' rectangle of your choice
If you want to cancel the move, you can click on the cancel icon to the right of the item you are moving.
You can also create a simple folder structure and place items into the folders. Click on the right pointing arrow next to the item you wish to put into a folder.

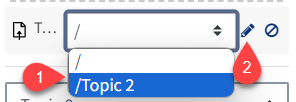
- Click on the drop-down list to move the item to an existing folder.
- Or type into the text box to create a new folder.

Things to keep in mind
Some things that are worth bearing in mind when using the sharing cart:
- You can’t share your sharing cart – The sharing cart is a personal area. Users cannot see the contents of each other’s sharing carts.
- You can’t stop other teachers from copying content – If someone has teacher or course administrator access to your QMplus area, they can copy any items from that area into their own sharing cart
- It creates copies of items – When you put something into your cart, you create a copy of it. There is no link between the original and the copy.
If you update the original, the changes are not reflected in the copy. Similarly, when you transfer something out of your cart, you create a copy. This does also mean that deleting copies has no effect on the originals, i.e. deleting something from your cart will not delete the item anywhere else. So don’t be afraid of emptying your cart! - The cart is meant as a temporary storage area while you move things from place to place. We recommend that you empty your cart when you are finished as this may lead to issues if multiple users are storing large amounts long term in their cart.
- Copying large numbers of items can take time – If you choose to copy whole topics with lots of content, the process of copying things in and out of your cart may take some time. Be patient until the process completes.
An important note about H5P/Interactive Content
The sharing cart does not work with the H5P/Interactive Content activity. If you try to use it to copy this content, you will find that the copy process never completes. If you want to copy a whole topic which has H5P content in it, we recommend you move it out of the topic before copying the topic into your sharing cart and then move it back in to the topic afterwards.
If you need to copy an H5P/Interactive Content activity from one QMplus area to another, we recommend that you use the import/export function within the activity itself.
See this guide on Creating interactive activities with H5P for more information.