QMplus enrolment methods
Remember, students normally get automatic access to their QMplus course once they have completed their registration in SITS. The instructions below are typically ways to enrol staff, not students.
There are several ways to give people access to a QMplus course.
Manually enrol individual accounts onto a specific QMplus course
- Go to the Participants section (from Course navigation at the top of the QMplus course page)
- Click the 'Enrol users' button at the top right or bottom right of the page.
- *Browse or search for the user within the dropdown menu next to 'Select users' (note that when searching for users, exact matches are listed first). Click the downward triangle to browser for users, or begin typing in the box to search for users.
- Click the user to select them. The user will appear above the dropdown menu, indicating that the user is enrolled.
- Use the 'Assign roles' dropdown if you wish to change the role (typically you will be enrolling a teacher or a viewer).
- Click 'Show more' to expand the enrolment options and set them as appropriate. These include the enrolment duration.
- When you have finished, click the 'Enrol selected users and cohorts' button.
*Note, by default, Moodle shows up to 100 participants in the list. If you have more than 100 users, it can be difficult to enrol multiple users quickly.
The user will then appear in the list of enrolled users.
More information: Manual enrolment (Moodle Doc)
Bulk enrol a large number of accounts onto a QMplus course
Only users who have administrative access to QMplus can bulk enrol users onto a QMplus course. Teachers can manually enrol several users at once, but administrators can bulk enrol via a spreadsheet.
Step 1 - Create your CSV
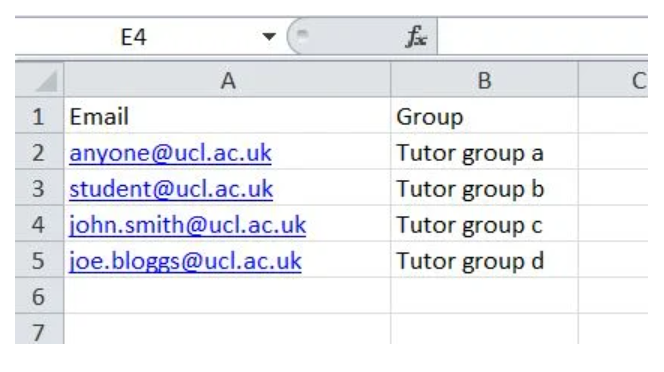
In order to upload your students successfully, you will need to create a CSV file with the students details. CSVs are simple to create - one way is in a spreadsheet package, making sure to save it as a .csv file type. At minimum, your CSV file should contain one column for the main student identifier, usually their email address but it can also be their userid, or student ID number.
Ensure you have column labels - this is because QMplus anticipates these and so ignores the first row of CSV file. In other words, don't put any actual student data in your file's top row. If you are using email then put 'email', if you are using user IDs then put 'userid'. If you want to enrol the students into Groups, include a second column which gives the group name for each student. Be careful to type these exactly. Give it a column heading 'group'. You can add subsequent groups in subsequent columns.
Step 2 - Enrol the Students
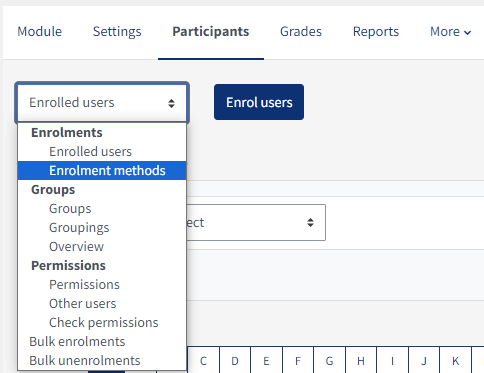
- In the Participants section, under the course navigation, click Enrolled Users dropdown list > then select Bulk enrolments.
- Select Choose a file and upload your CSV file.
- Make sure Role to assign is left as student.
- Set First column contains to reflect they type of data you have used in your spreadsheet, either the students' email address, userid or ID number.
- If you need to create groups, ensure Create group(s) if needed is set to Yes.
- If you would like to create groupings in your course, based on the groups that the students will been placed into, ensure Create grouping(s) if needed is kept to yes. If you do not want to create groupings, set this to No.
- To receive an email report confirming which students have been enrolled and which groups they have been placed into, keep Send me a mail report set to Yes.
- Click Enrol them to my course.
- Check the students have been enrolled in their groups by going to the Settings menu and under Course Administration click on Users then Groups.
- You should see the groups listed, followed by the number of students in each group in brackets.
- You can also bulk unenrol students from your course by clicking on Bulk unenrolments under the same section, and following the instructions above.
Allow users to self enrol onto a QMplus course
- In your course, click the Participants link from Course navigation
- From the dropdown select click Enrolment methods
- Open the "eye" icon next to the Self enrolment method
Give guest access to a QMplus course
Guests may be allowed to view course contents, but not participate in them if guest access is enabled.
- From Course navigation, click 'Participants', and then from the dropdown, click 'Enrolment method > Guest access'.
- Enable guest access by clicking on the "eye" icon or by choosing it in the 'Add method' dropdown menu.
- If you wish to set a password, then click the configure icon and type in your password here.
Warning! If you allow guest access on your course, anyone will be able to access it without logging in to QMplus. They will also be able to view content via search engines such as Google.
Give access to someone who isn't a member of QMUL (Affiliate Accounts)
- The person’s full name
- Their external email address
- The length of time that they will need access to QMplus (up to one year)